
Google Dedicated Sending Domain Setup (Email System)
Covered in this article
- [Step-by-step Email System Dedicated Domain Setup - Google Domain](#Step-by-step-Email System-Dedicated-Domain-Setup---Google-Domain)
- To add the 1st TXT record
- To add the 2nd TXT record
- To add the MX records, click Create new record
- To add the CNAME record, click Create new record
Step-by-step Email System Dedicated Domain Setup
- Google Domain 1. Once you are in the sub-account > Click on Settings > Email Services > Dedicated Domain > + Add Domain Check out How to Migrate My Agency Over to Email System
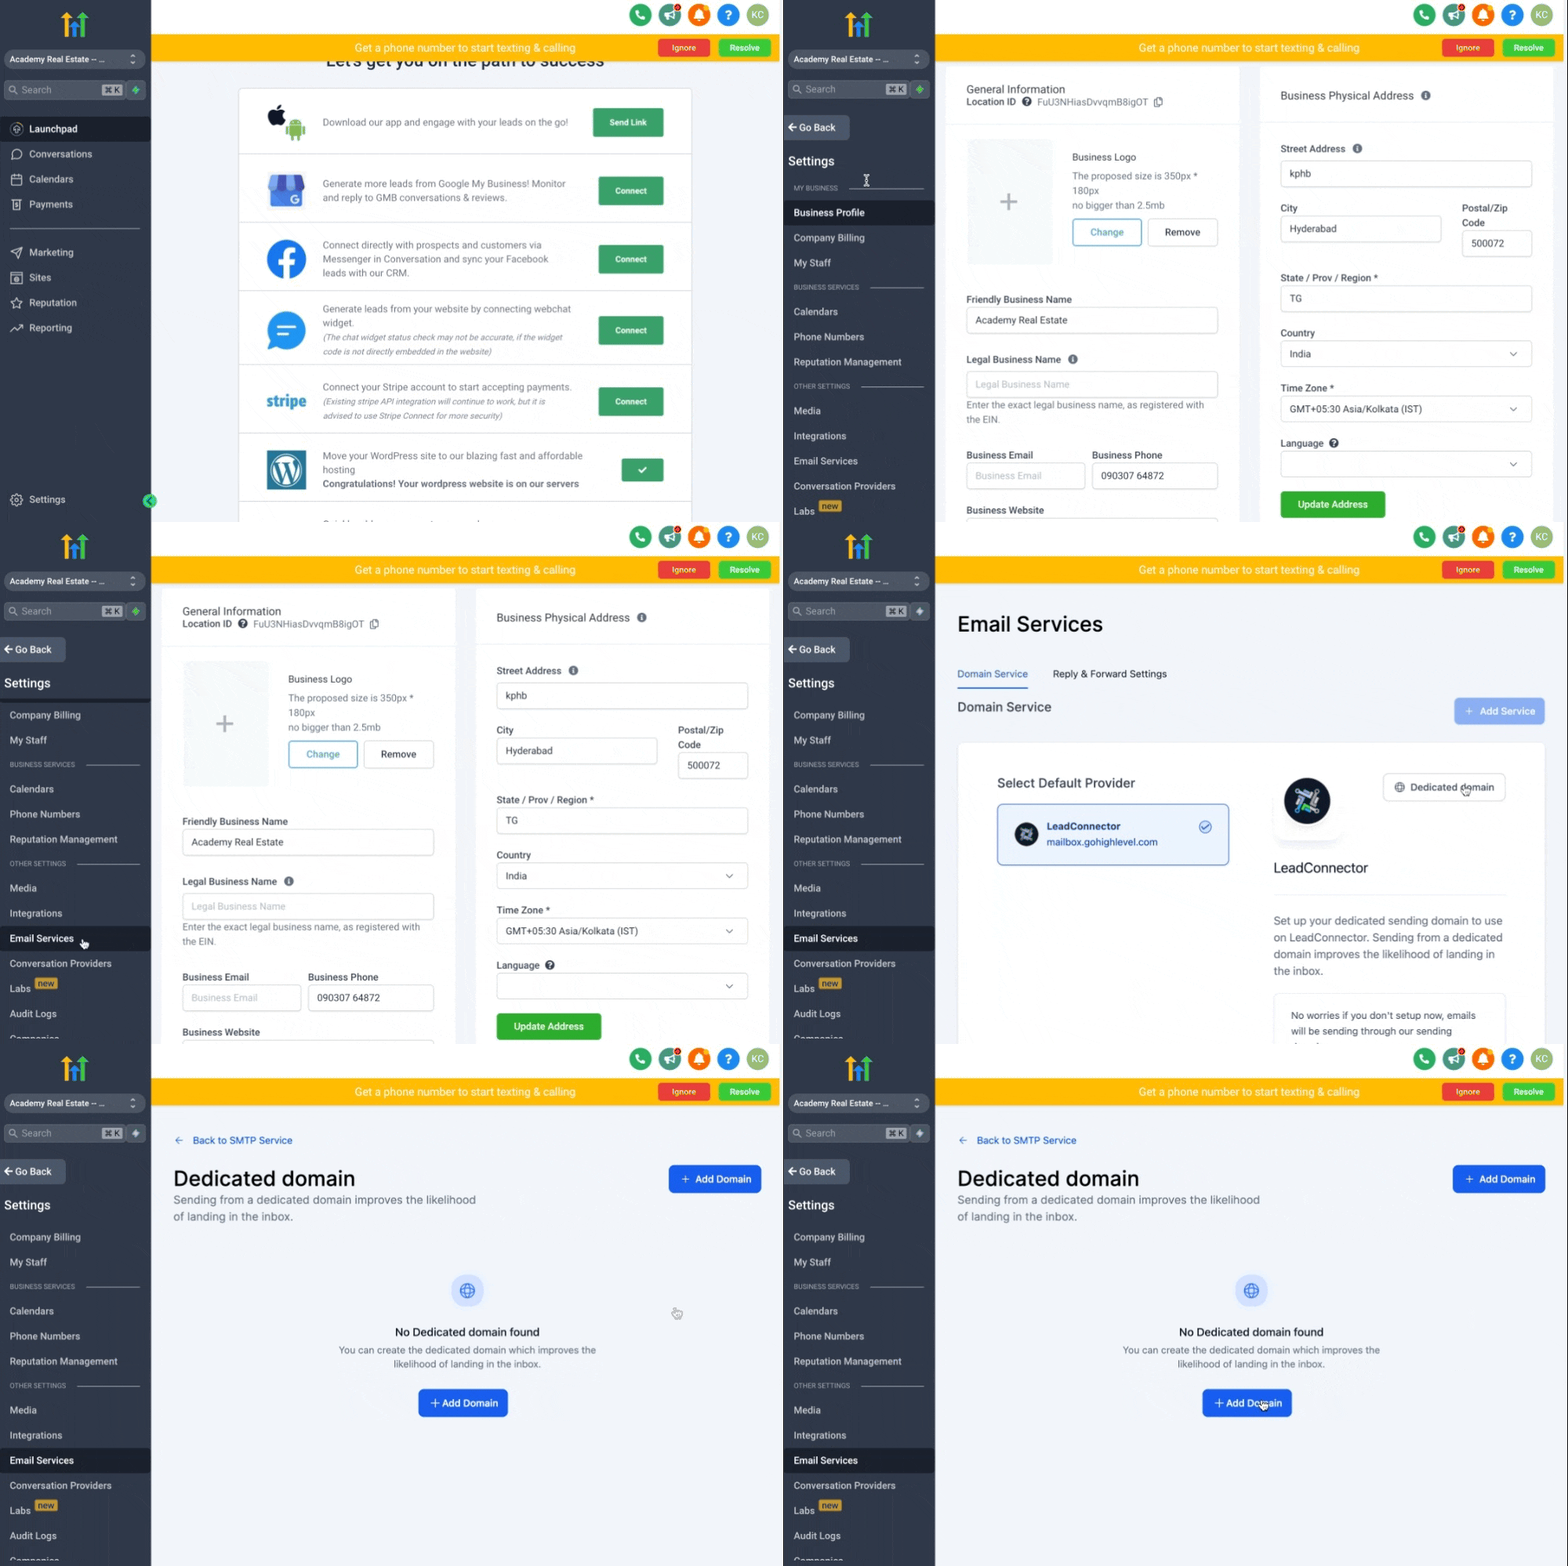
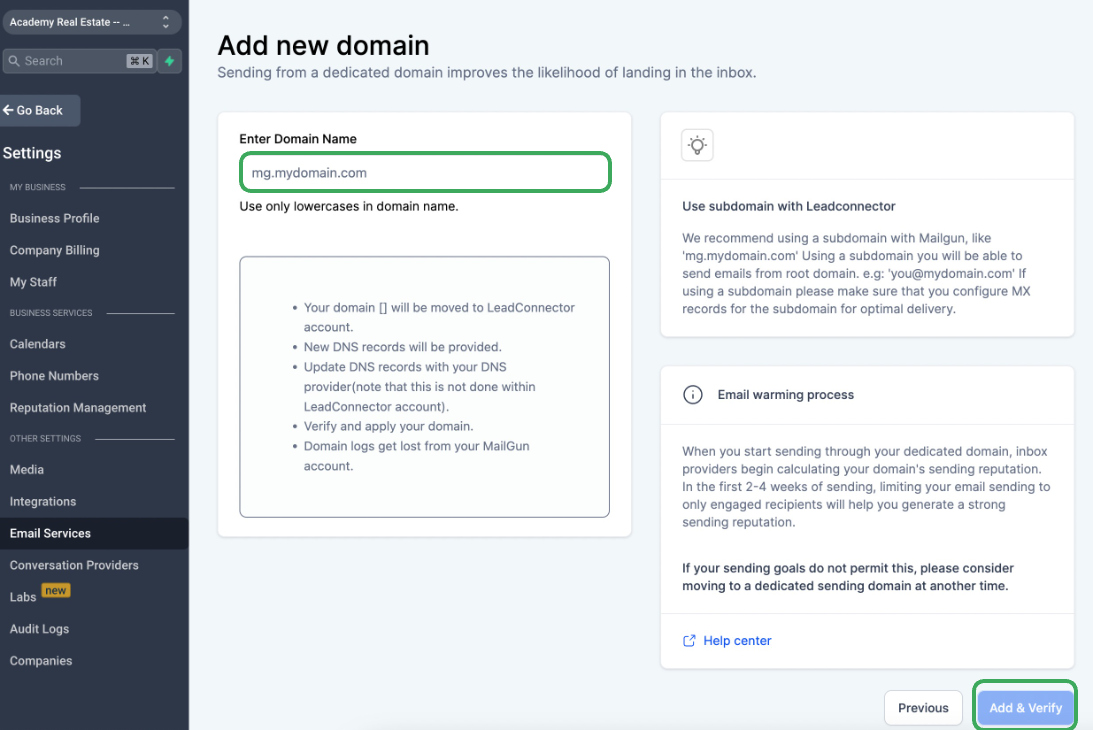
2. If your Domain is companyname.com, you can set up the main Domain or sub-domain with Email System. Check out How to move a sending domain from Mailgun to Patient Copilot? Main Domain:
- If you are adding the main Domain, it should not be used with Gsuite or any other email provider Sub-domain:
- To set up the dedicated subdomain within Email System, you can type ANYTHING_HERE.companyname.com - Examples:
- replies.companyname.com
- support.companyname.com 3. Click on Add & Verify
The next screen that you’re taken to will ask you to add DNS records to your Domain. Leave this screen open for the next step.
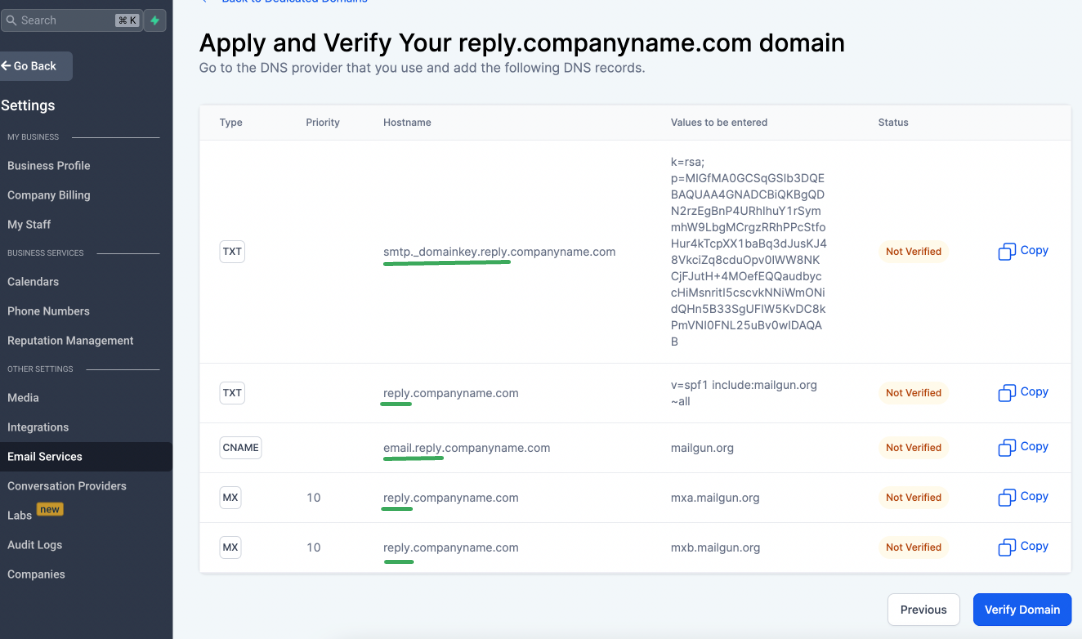
4. Now log in to your DNS records based on where you get the Domain and add the 5 DNS records.
To add the 1st TXT record 1. Log in to domains.google.com
- Click into the domain you are trying to set up
- Click DNS on the left panel, we are going to add 5 DNS records
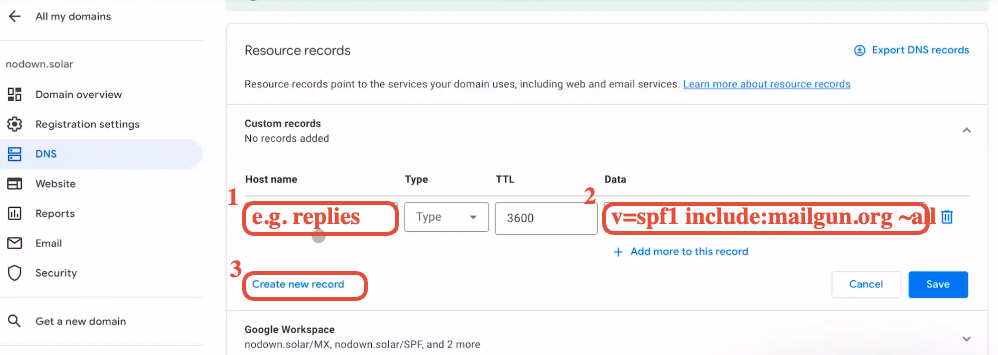
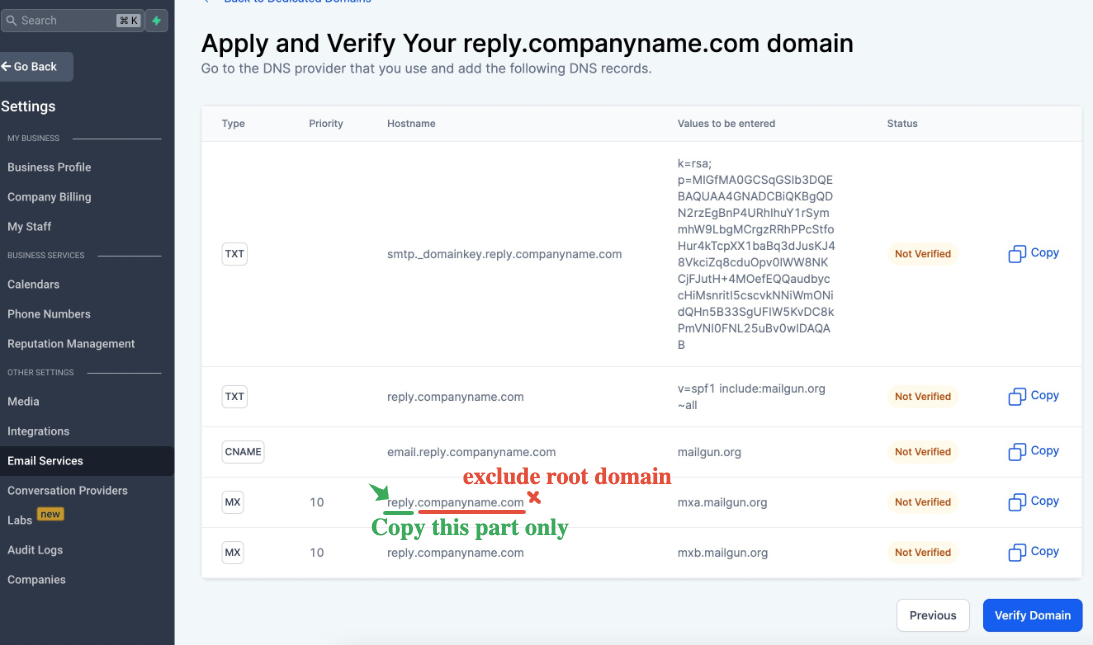
Host name: DO NOT INCLUDE THE ROOT DOMAIN - Depending on the subdomain you are trying to set up, if you are trying to set up
- lc.companyname.com - The host name will be lc(https://replies.companyname.com/)
- replies.companyname.com - The host name will be replies
- If you are setting up a main domain like companyname.com, the hostname will be @
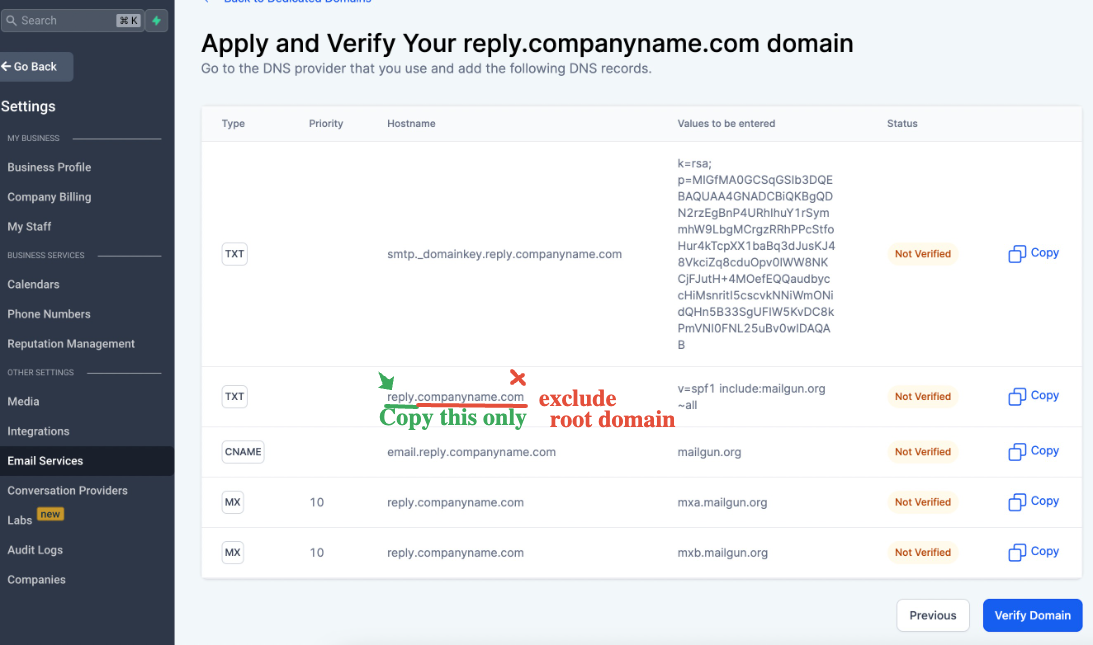
Type: Select TXT from the Type menu options. Data: Same for everyone - paste the following record v=spf1 include:mailgun.org ~all
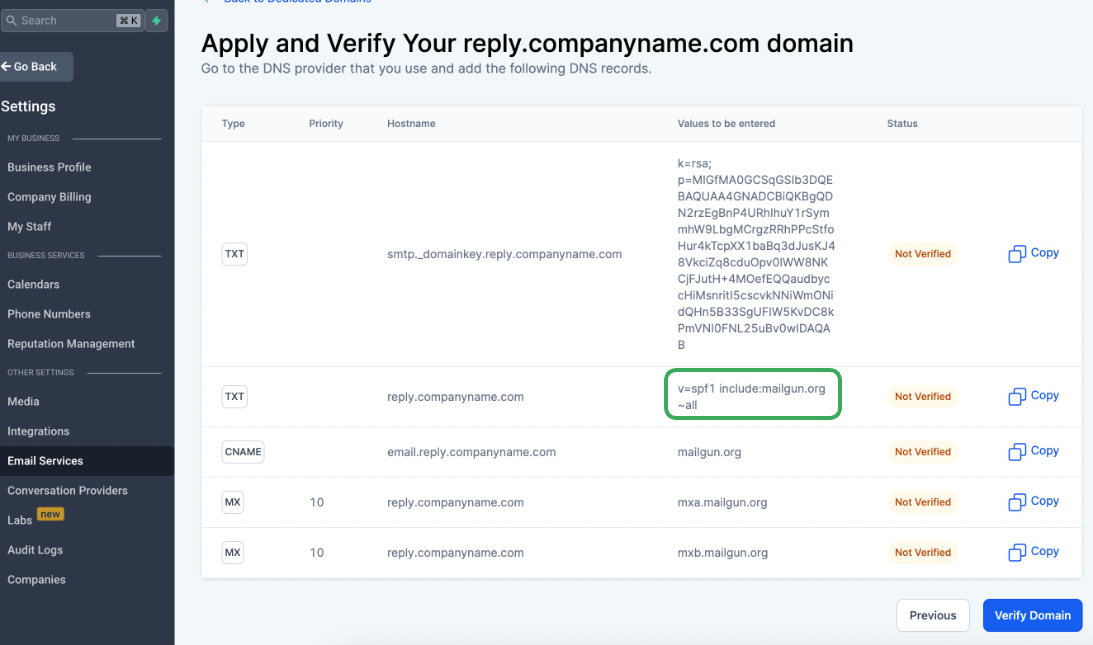
Don’t click save yet, 4 more new records to add Once you are done with the 1st record, click Create new record
To add the 2nd TXT record Type: Select TXT from the dropdown

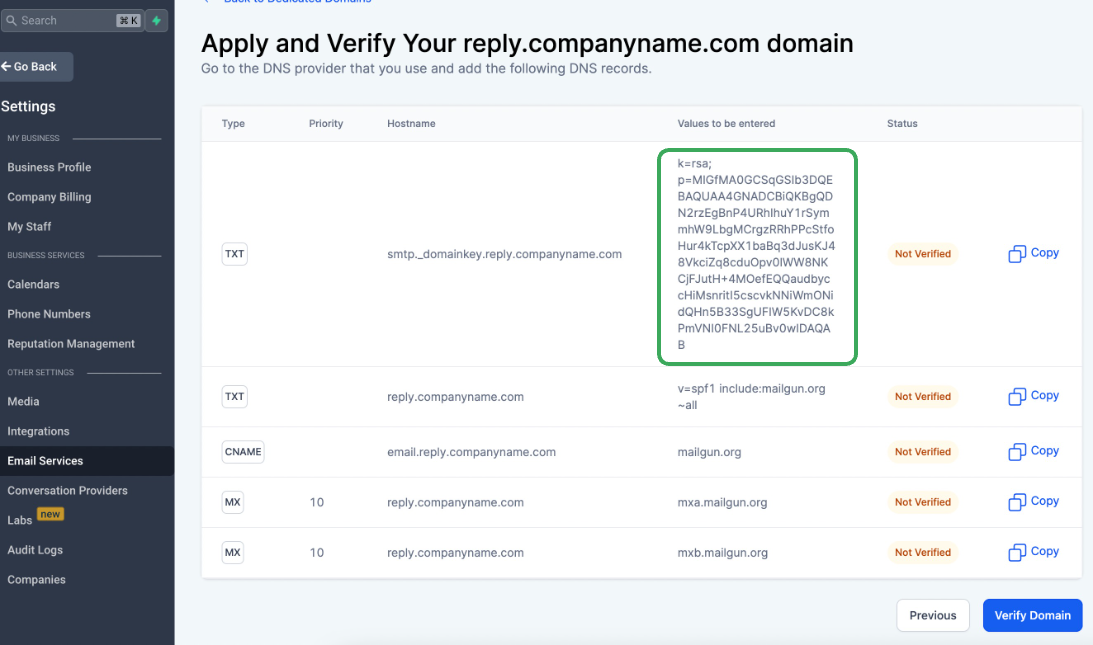
Host name: it’s a bit tricky but the key here is to copy everything from the beginning until the subdomain part, do not copy the main domain
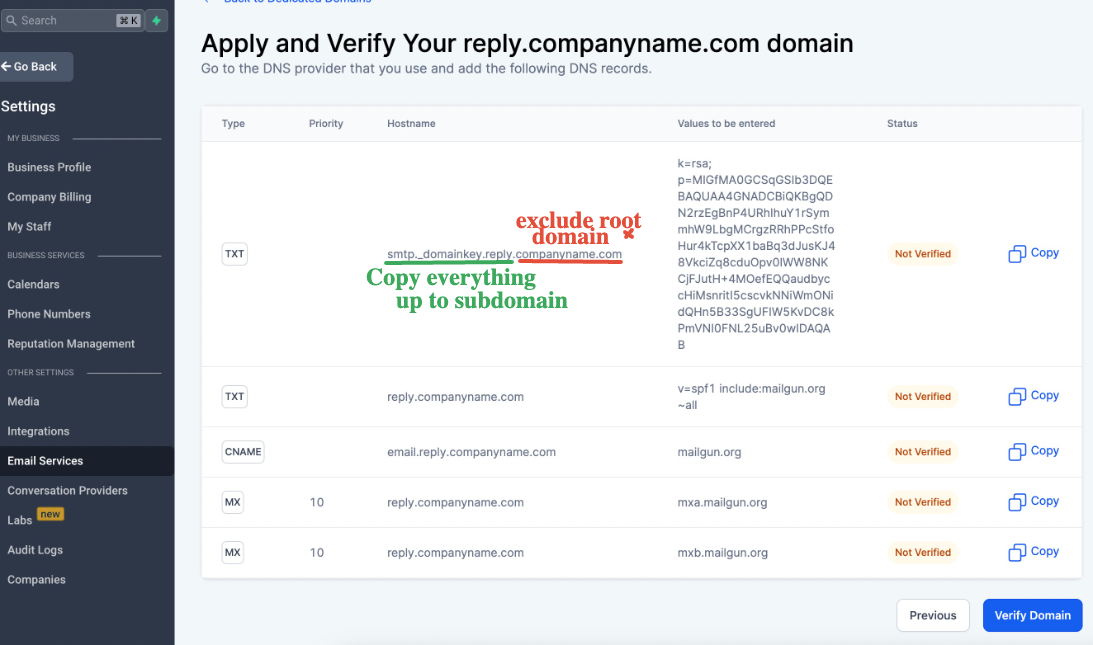
**Everyone’s 2nd TXT record hostname and value is different Examples: copy the highlighted part ONLY
Example 1 using subdomain: Copy mx._domainkey.helpdesk as the hostname | 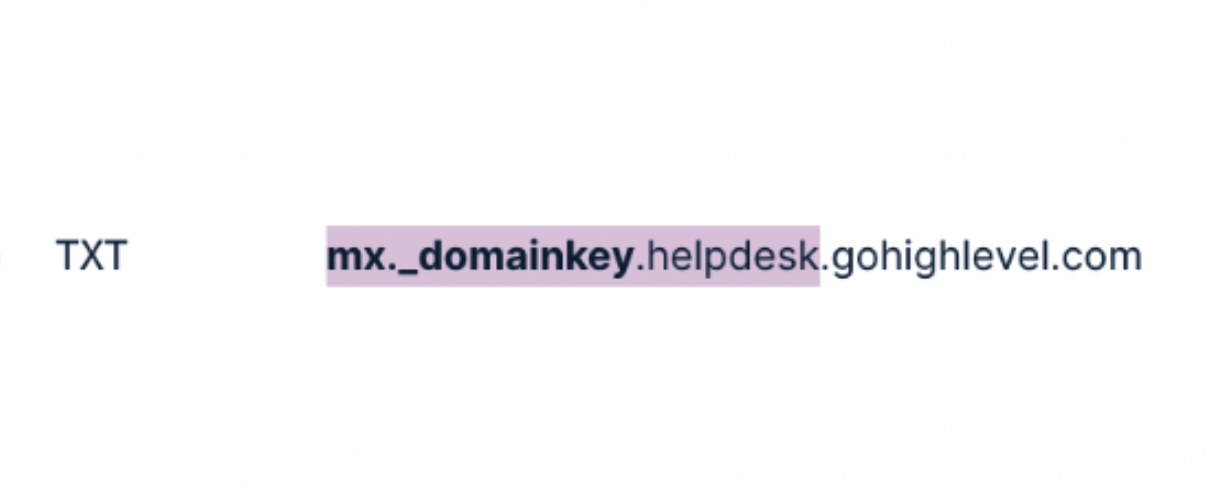 |
Example 2 using main Domain: Copy mailo._domainkey as the hostname | 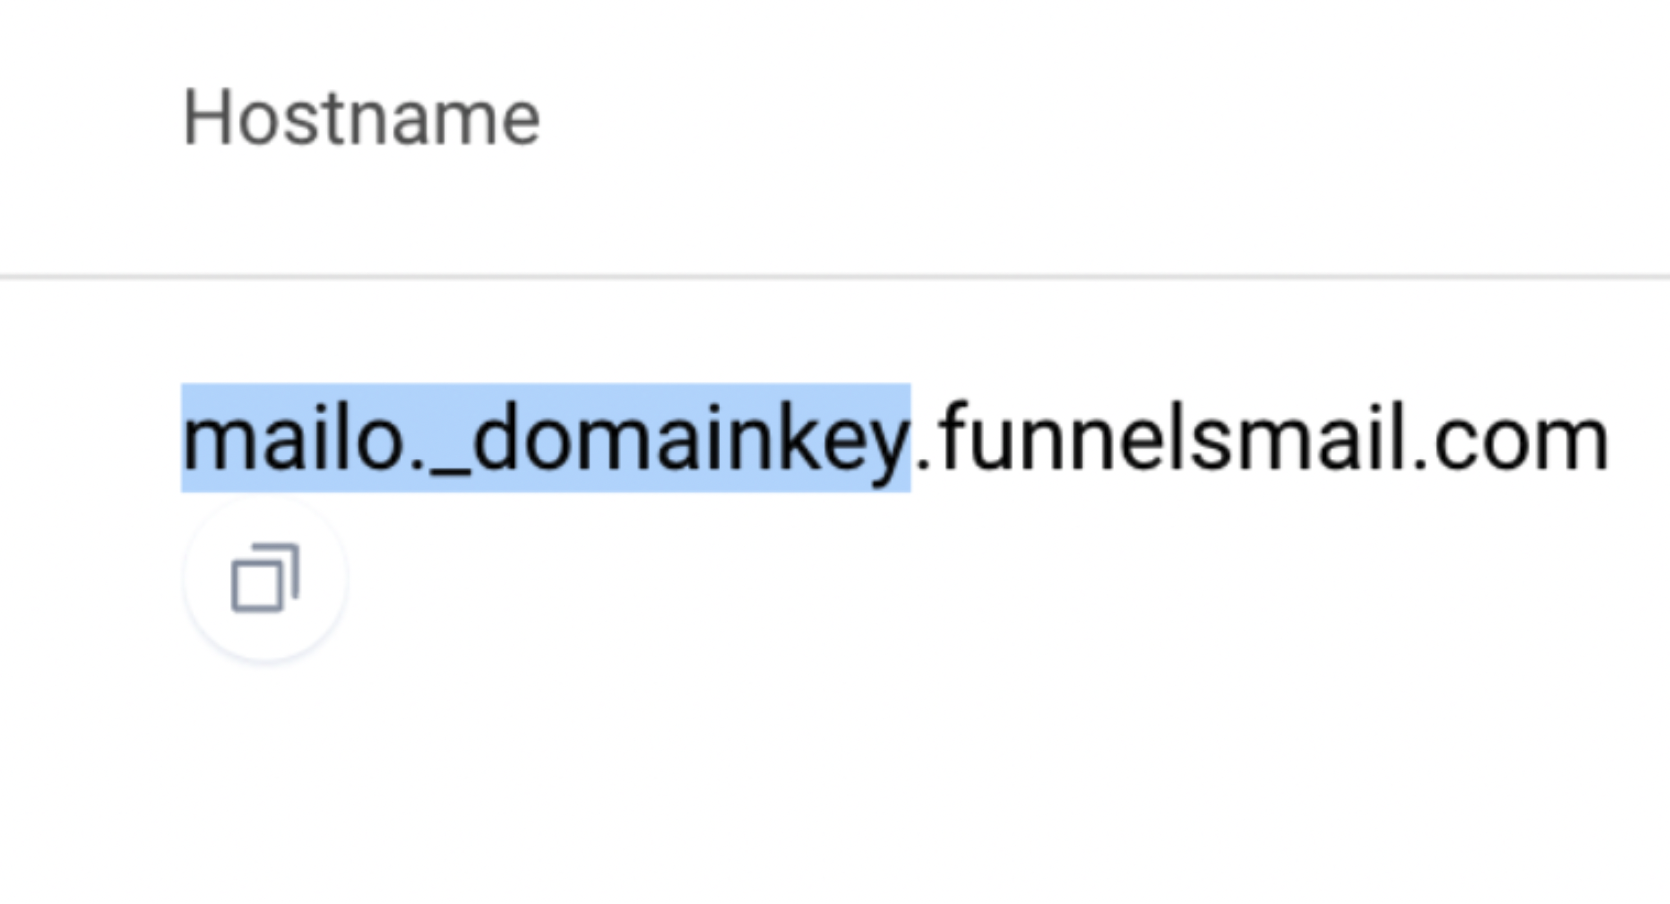 |
To add the MX records, click Create new record Depending on the subdomain you are trying to set up, if you are trying to set up
- lc.companyname.com - The host name will be lc(https://replies.companyname.com/)
- replies.companyname.com - The host name will be replies If you are setting up a main domain like companyname.com, the host name will be @ **
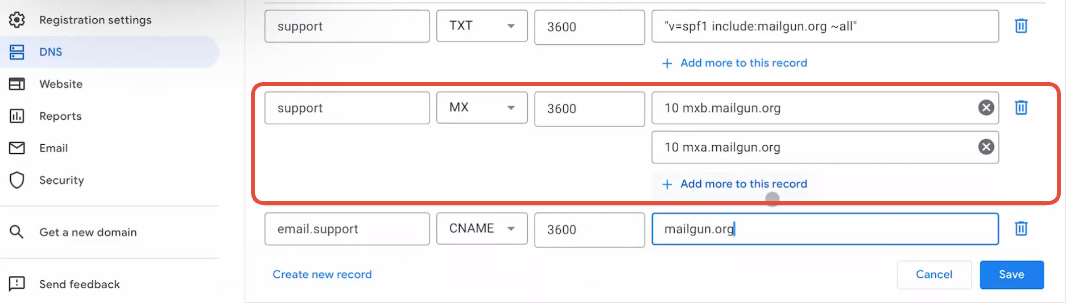
** If you have a Google Workspace account for receiving and sending emails on your root domain ([email protected]). In this case, make sure you are using a subdomain for your Email System dedicated domain. Check out the article: Can I Use the Same Domain Name for Mailgun and for Google Apps (Or Another Email Server)? Type: Select MX from the dropdown Data: paste the following data - Copy and paste 10 mxa.mailgun.org
- Click +Add more to this record - Copy and paste 10 mxb.mailgun.org

To add the CNAME record, click Create new record Depending on the subdomain you are trying to set up, if you are trying to set up
- lc.companyname.com The host name will be **email.**lc
- replies.companyname.com The host name will be **email.**replies If you are setting up a main domain like companyname.com, the host name will be email Type: Select CNAME from the dropdown Data: copy and paste mailgun.org
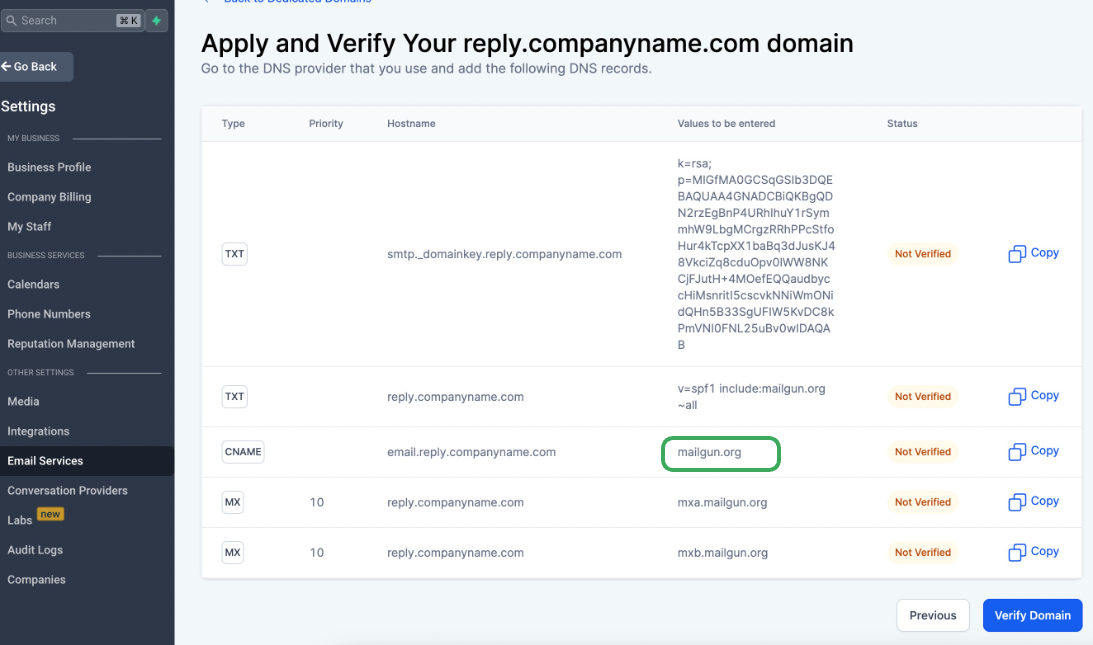
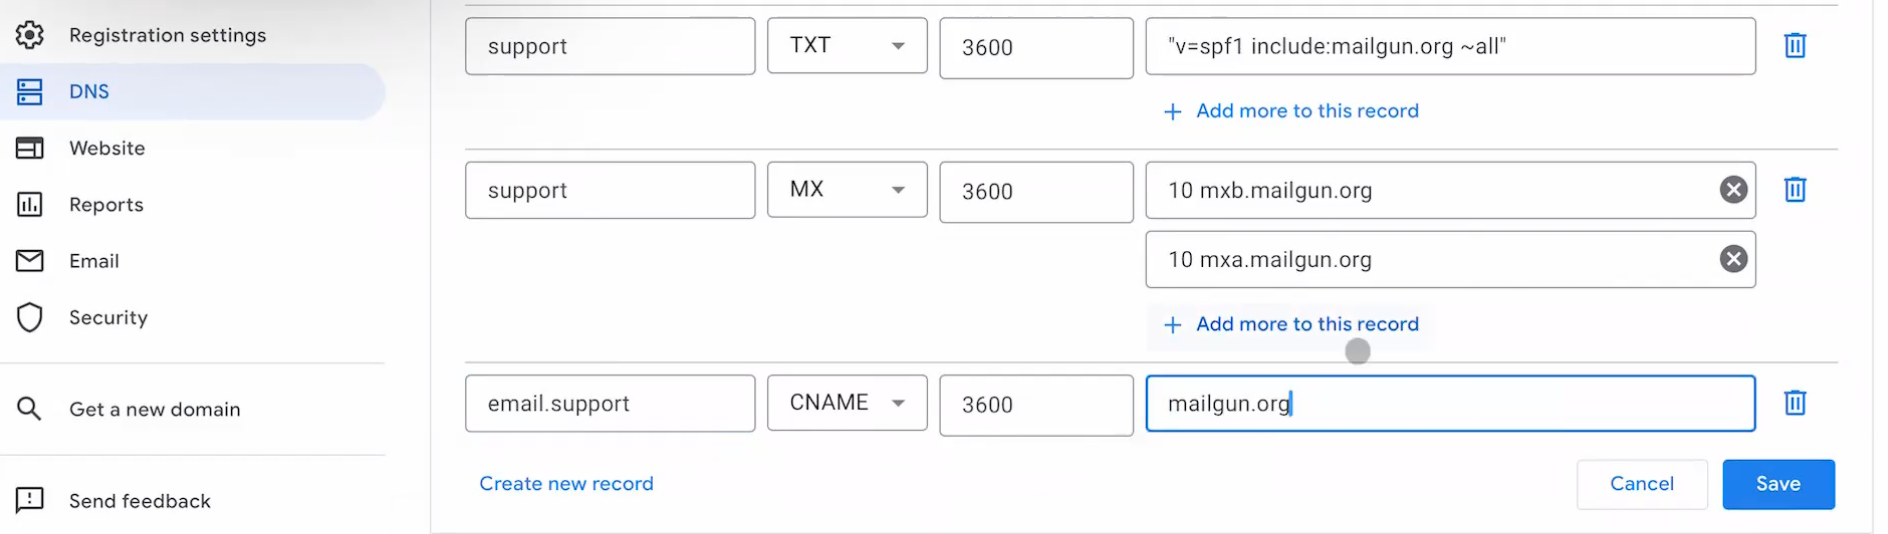
Now that you have added 5 DNS records, click “Save” Next, go back to the Email Services tab and click “Verify Domain”
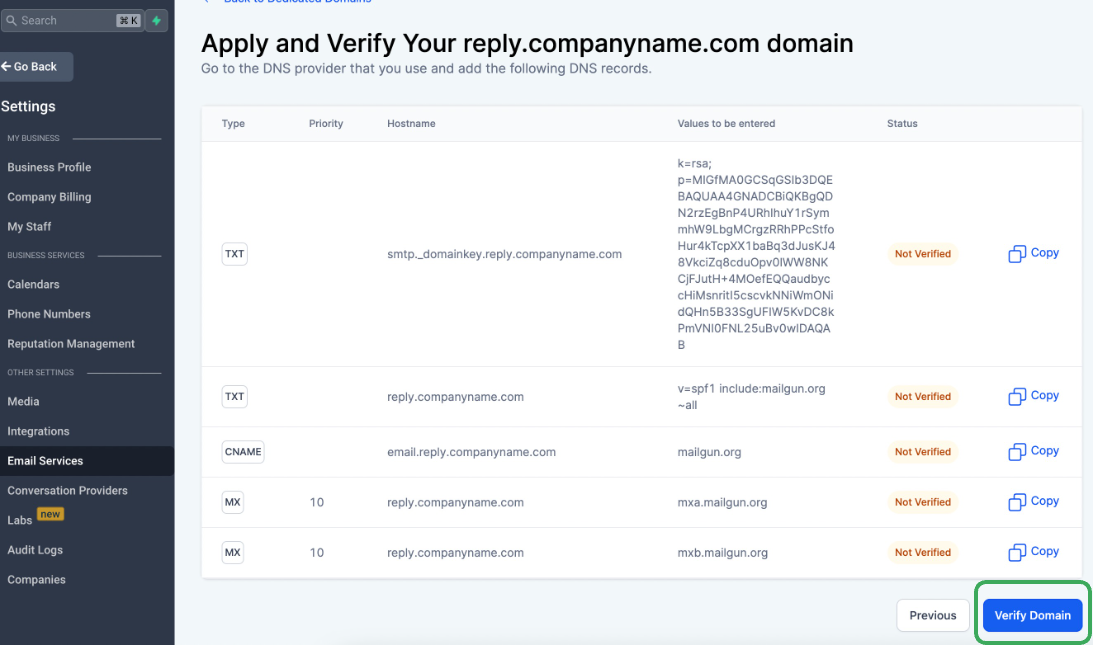
Click the same button to “Verify Domain” again if some records are still not showing the green checkmark Once you add all the DNS records and verify, you can make sure the SSL Certificate for Dedicated Sending Domain (Email System) is all set. Finally, be sure to send a test email to ensure emails are being sent properly. Click here to learn How to send a test email in the Conversation