
How to Use Badges in Certificate Builder
Celebrate achievements and motivate your learners with the new Badges feature in Patient Copilot’s Certificate Builder. This article will show you how to use Badges to visually recognize achievements like course completions, skill milestones, and more.
What is the Badges in Patient Copilot Certificate Builder?
Badges in Patient Copilot Certificate Builder are customizable digital icons awarded for accomplishments such as skill milestones, course completions, or custom achievements. These badges serve as motivational tools, providing a modern way to recognize and celebrate learner progress within your brand’s ecosystem. With flexible design options and easy sharing capabilities, badges help reinforce engagement and professionalism in your courses and communities.
Key Benefits of Badges in Patient Copilot Certificate Builder
Badges offer a range of advantages for both creators and learners:
- Boosts Motivation: Encourages learners to complete lessons and reach milestones.
- Enhances Engagement: Makes progress visible and rewarding, increasing participation.
- Custom Branding: Allows full control over badge appearance to match your brand identity.
- Professional Recognition: Adds credibility and professionalism to your courses.
- Easy Sharing: Lets users download badges or share them on social media, amplifying your brand.
- Flexible Design: Offers templates and an element library for quick, creative badge creation.
- Scalable Recognition: Supports issuing badges at scale for various achievements.
How To Create and Customize Badges
Setting up badges ensures your learners are recognized for their achievements in a visually appealing and branded way. Follow these steps to create and issue badges:
Step 1: Access the Certificate Builder
- Log into your Patient Copilot sub-account. 2. Click on Memberships from left-hand menu. 3. Click the Credentials tab. 4. In the top-right corner, click the + Create button. 5. Select Create Badge from the dropdown.
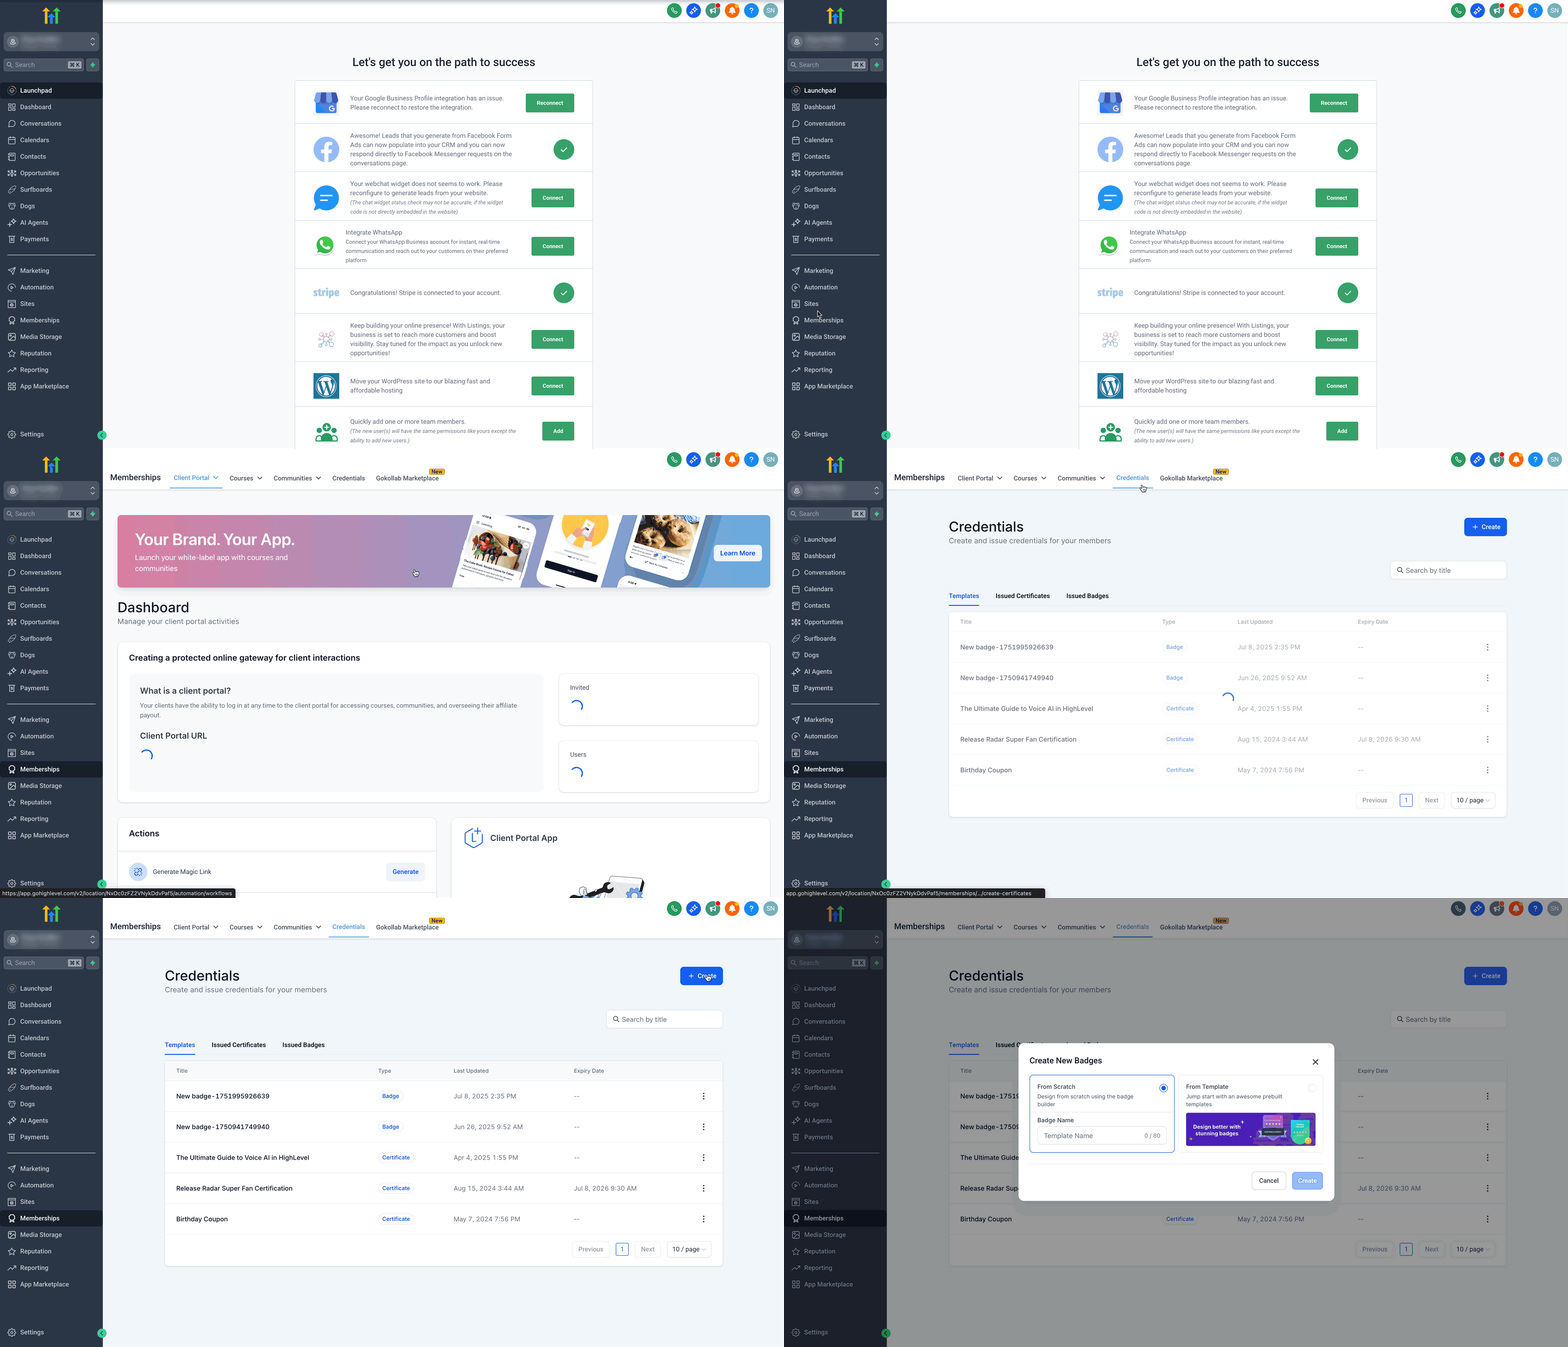
Step 2: Choose a Template or Start from Scratch You’ll be prompted to either:
- Start from scratch with a blank canvas, or
- Use a template from the built-in library - Select a template and click Create.
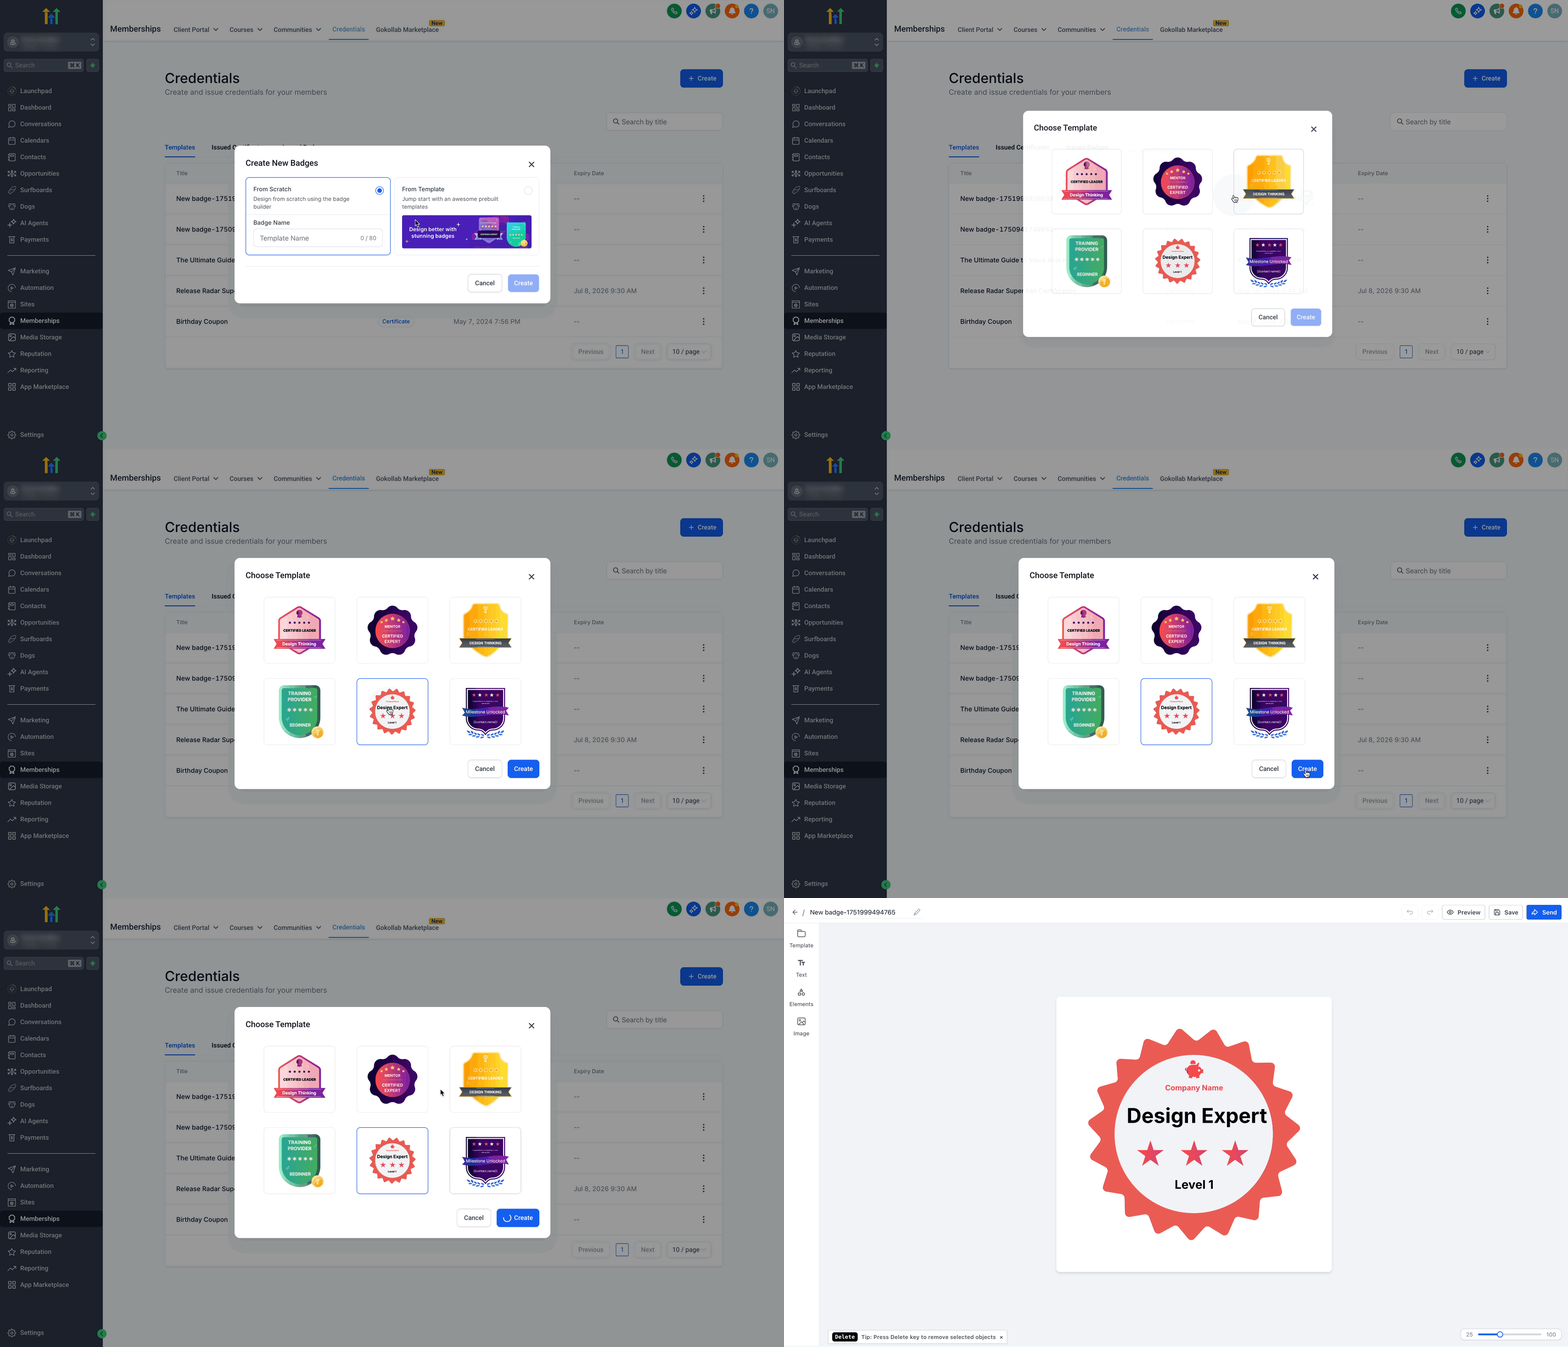
Step 3: Customize the Badge Design
Editing Experience Highlights -
The editing toolbar auto-hides while you move or rotate an element, so it does not block the canvas. -
Use the move icon to reposition very small or tightly packed elements more easily. -
Line and shape resizing is more reliable, and the canvas shows fewer corner markers for a cleaner view.
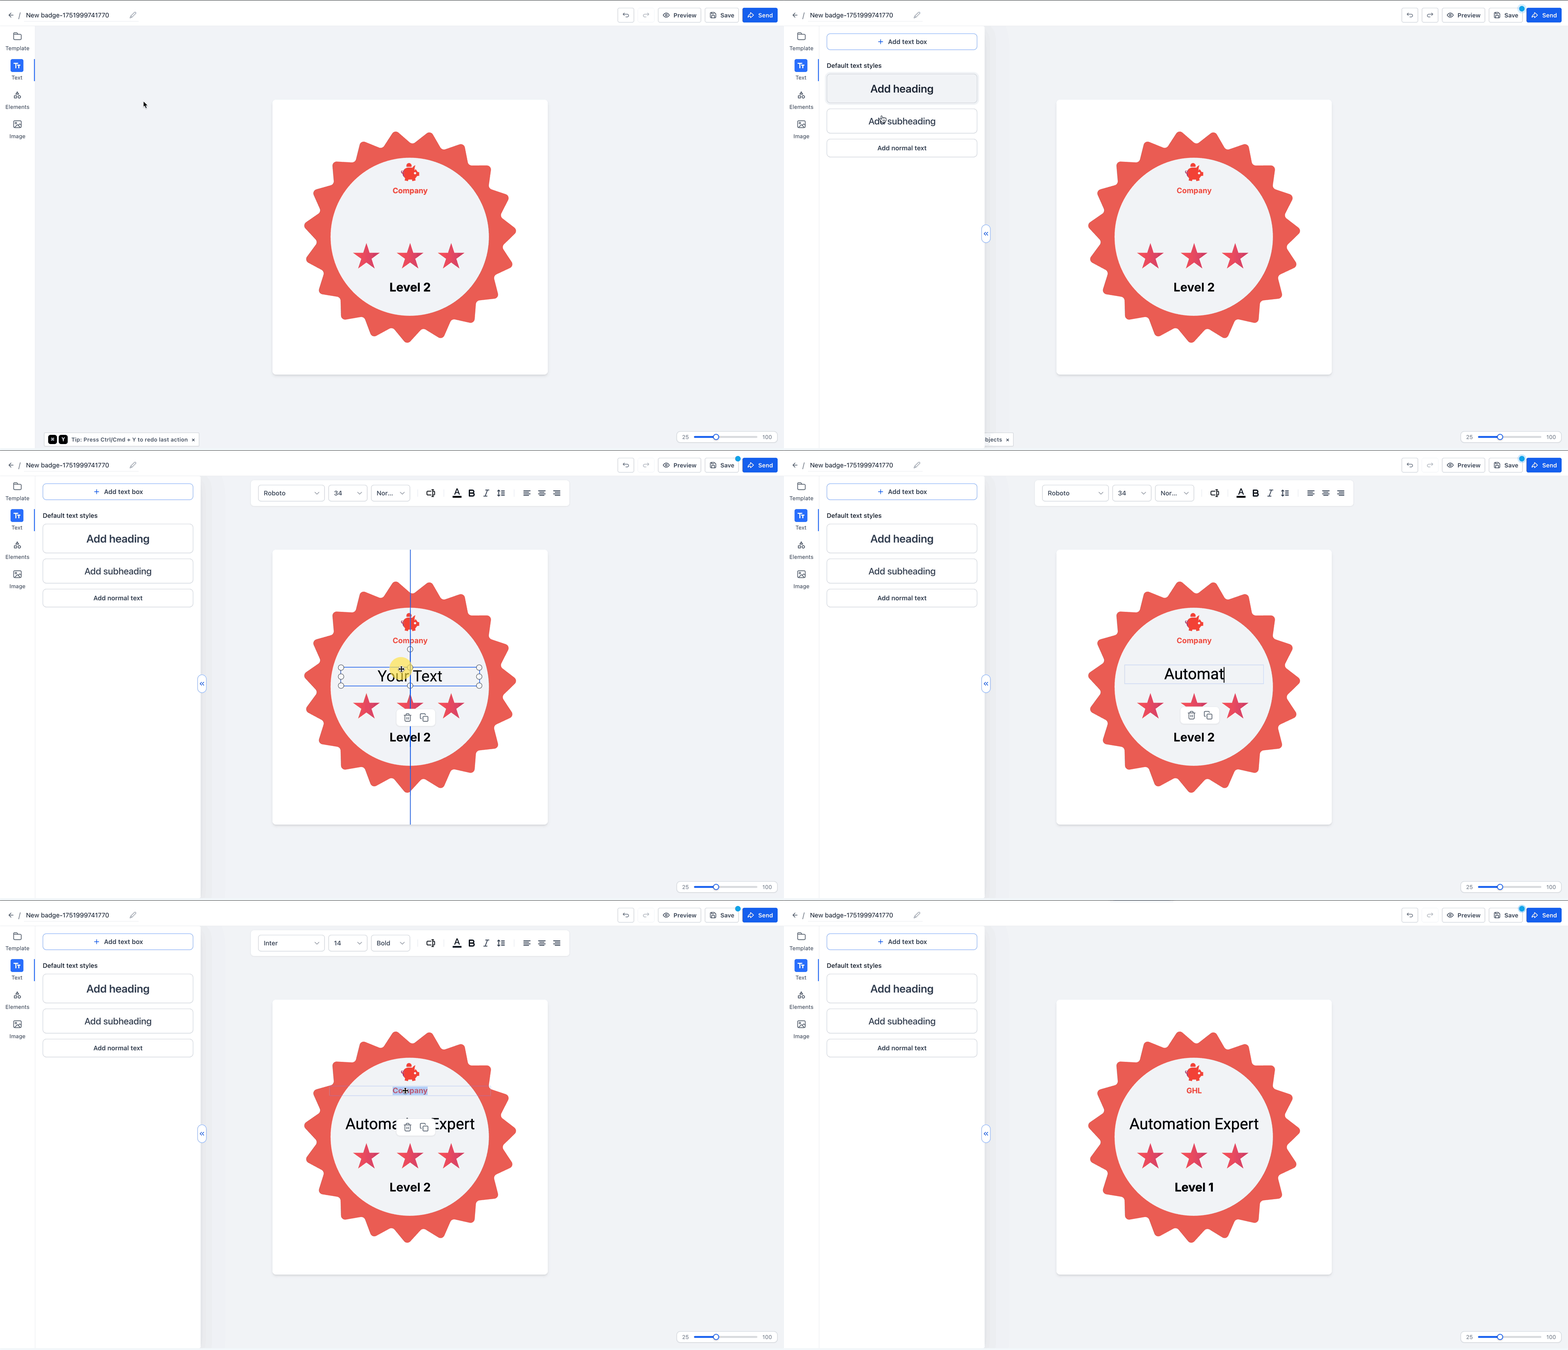
Edit Text - On the left panel, click the Text tab.
- Click + Add Text Box to insert text into your design.
- Choose from Heading, Subheading, or Normal Text options.
- Edit the text directly within the canvas.
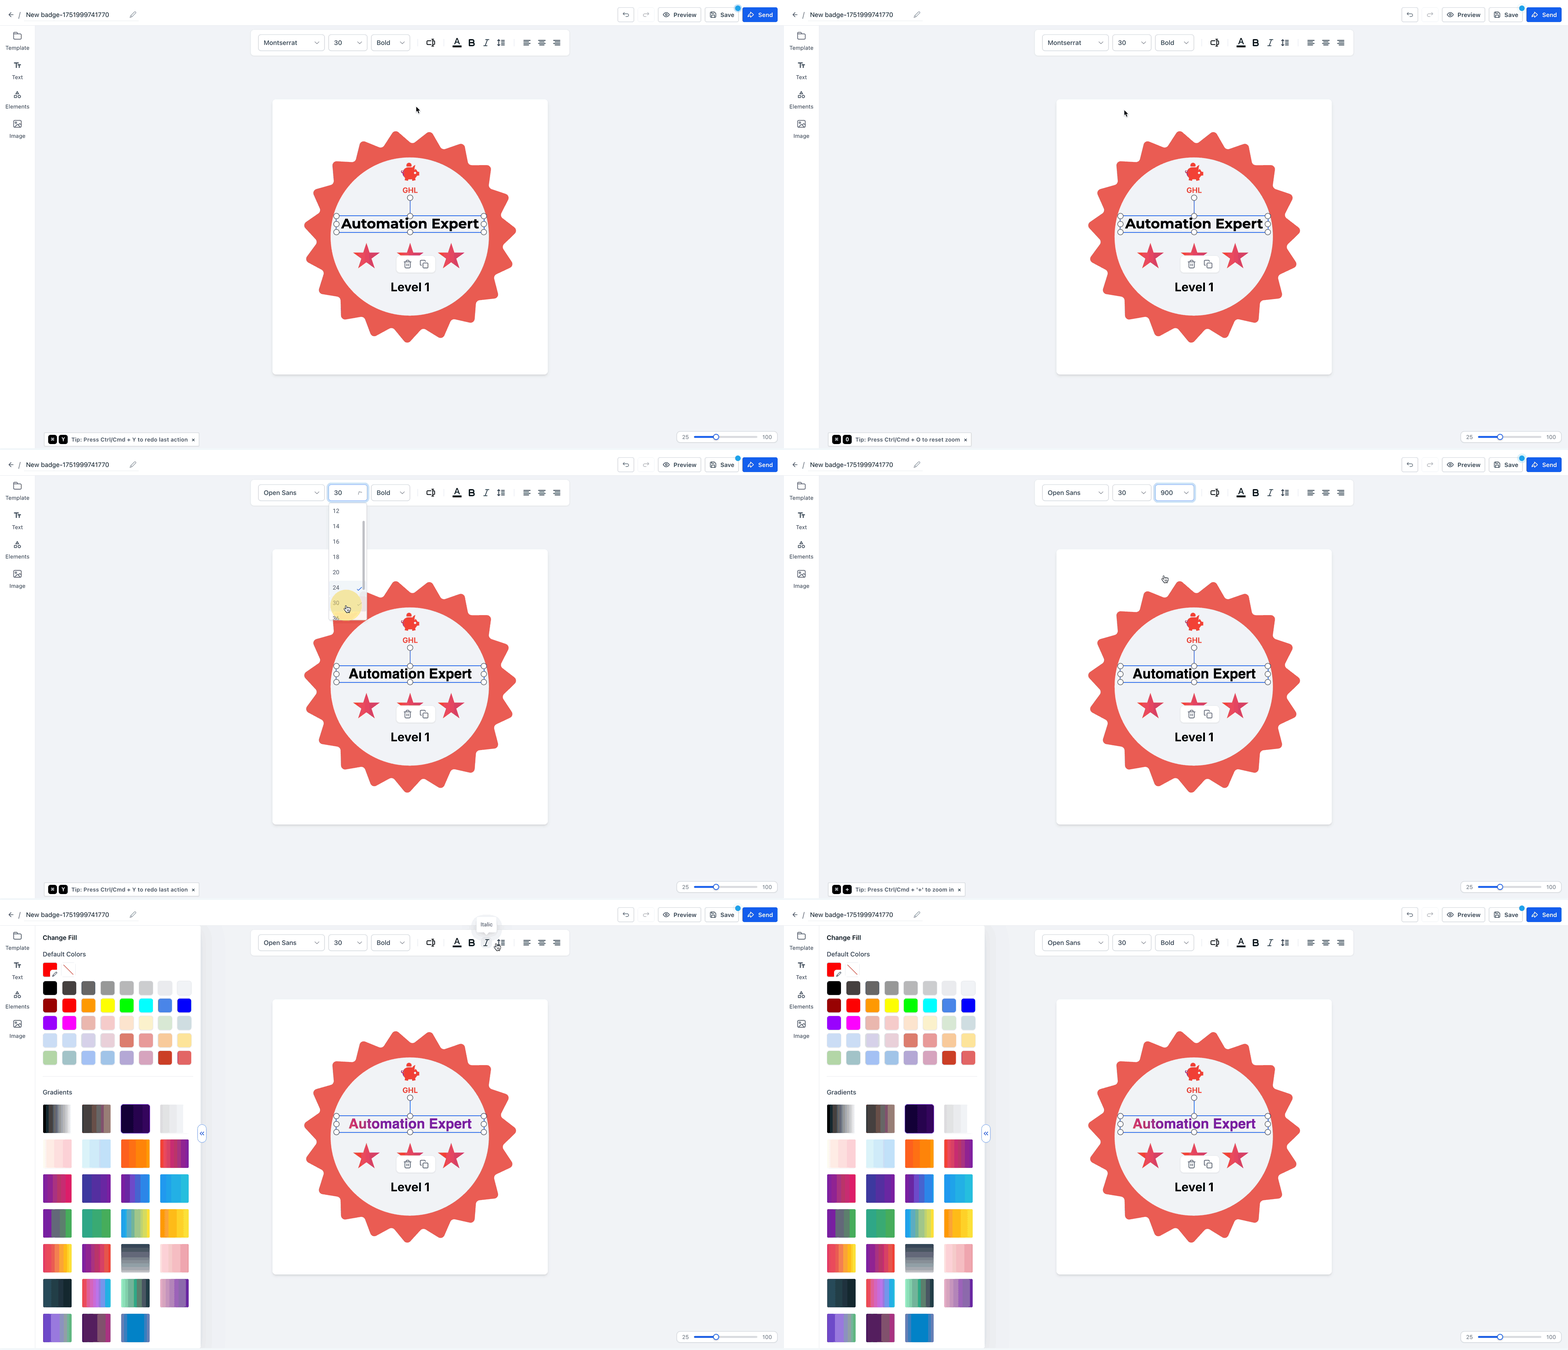
Style the Text Select a text element to style it:
- Change font family, size, and thickness/weight
- Change text color - Apply bold, italic
- Modify line spacing as needed
- Adjust alignment: Left, Center, Right
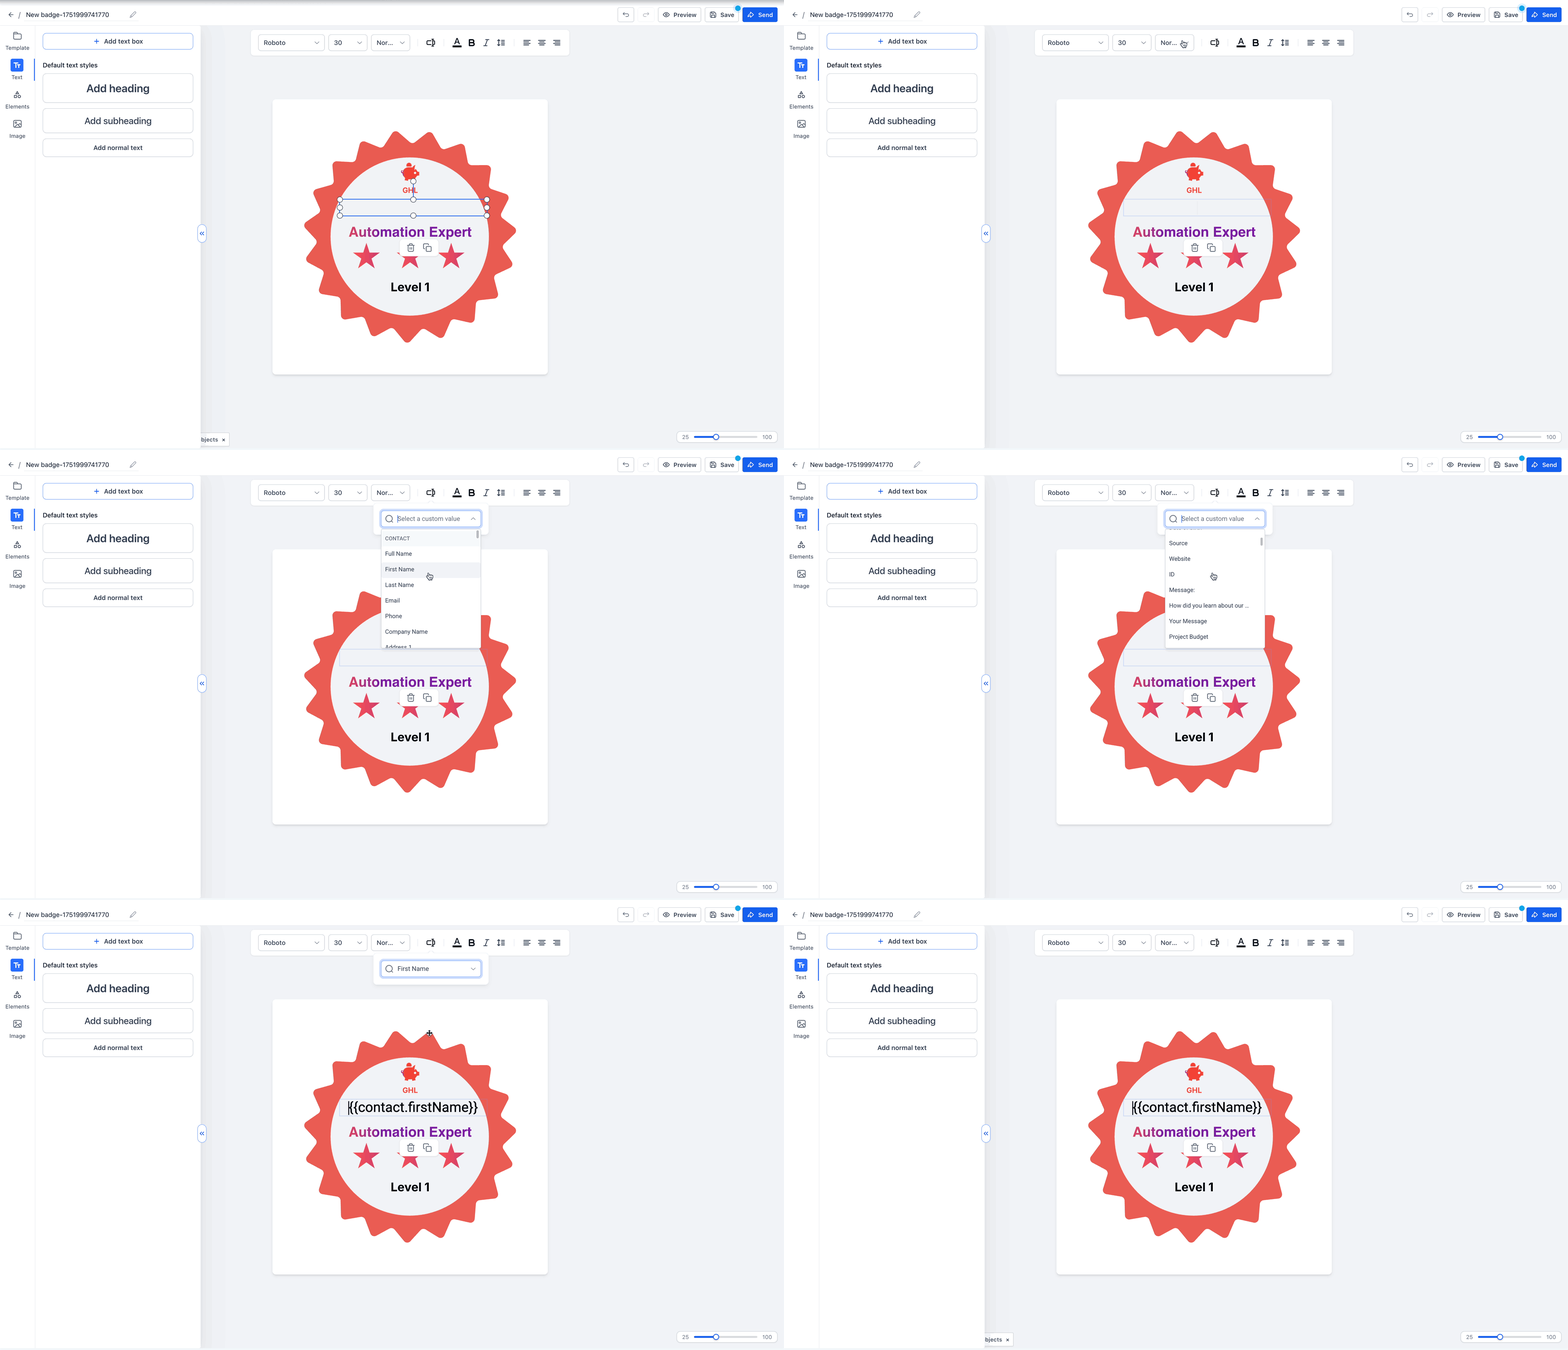
Add Custom Values
Click on a text box or add a text box and use dynamic tags to auto-fill values like:
- Contact Full Name, First Name, Last Name
- Email, Phone, Company Name
- Address, City, State, Country, and many more that you can choose from the list. Note: Only contact level custom values will populate (if present). Some custom values may go blank. Please recheck the template before sending.
Add and Customize Design
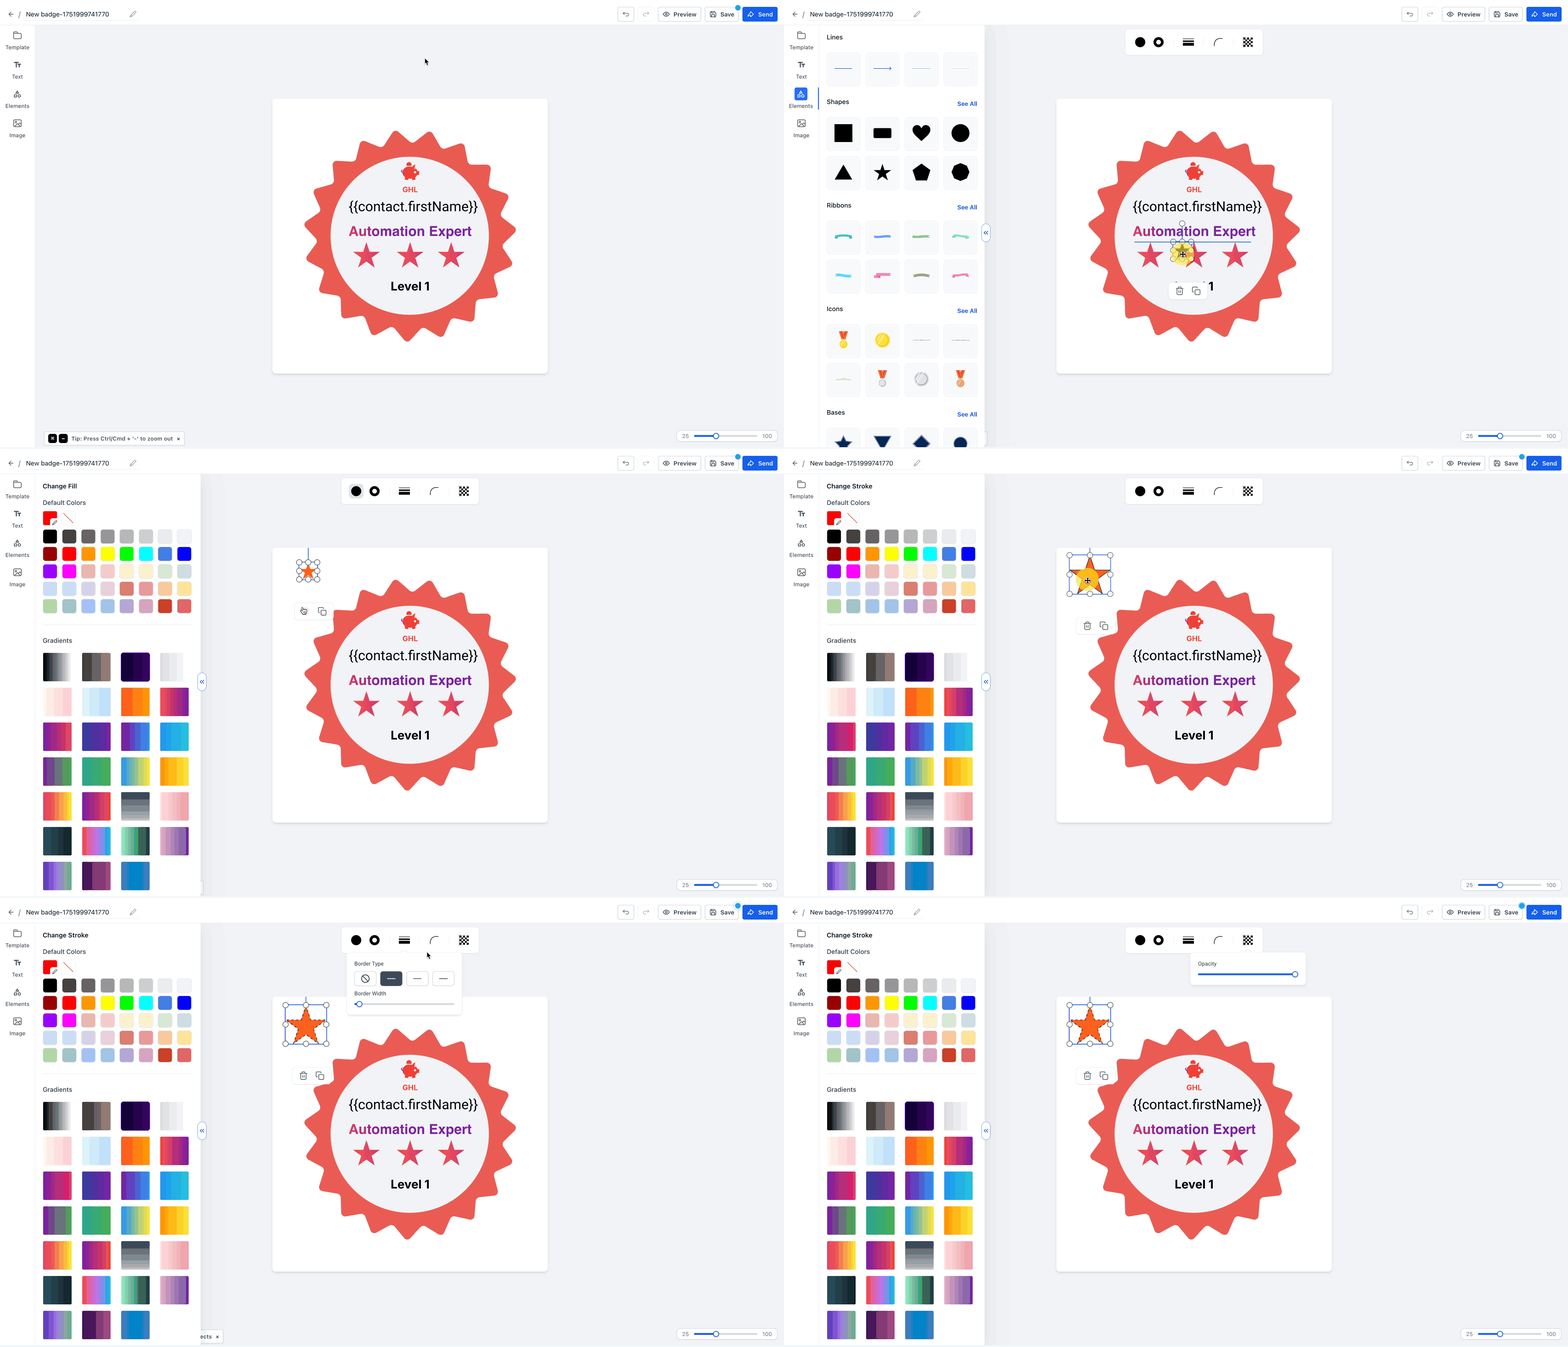
Elements - Click the Elements tab to add:
- Lines
- Shapes
- Ribbons
- Icons
- Bases - Select any shape or element to customize:
- Fill Color
- Stroke Color
- Change Border Type and Width
- Border Radius
- Element Opacity
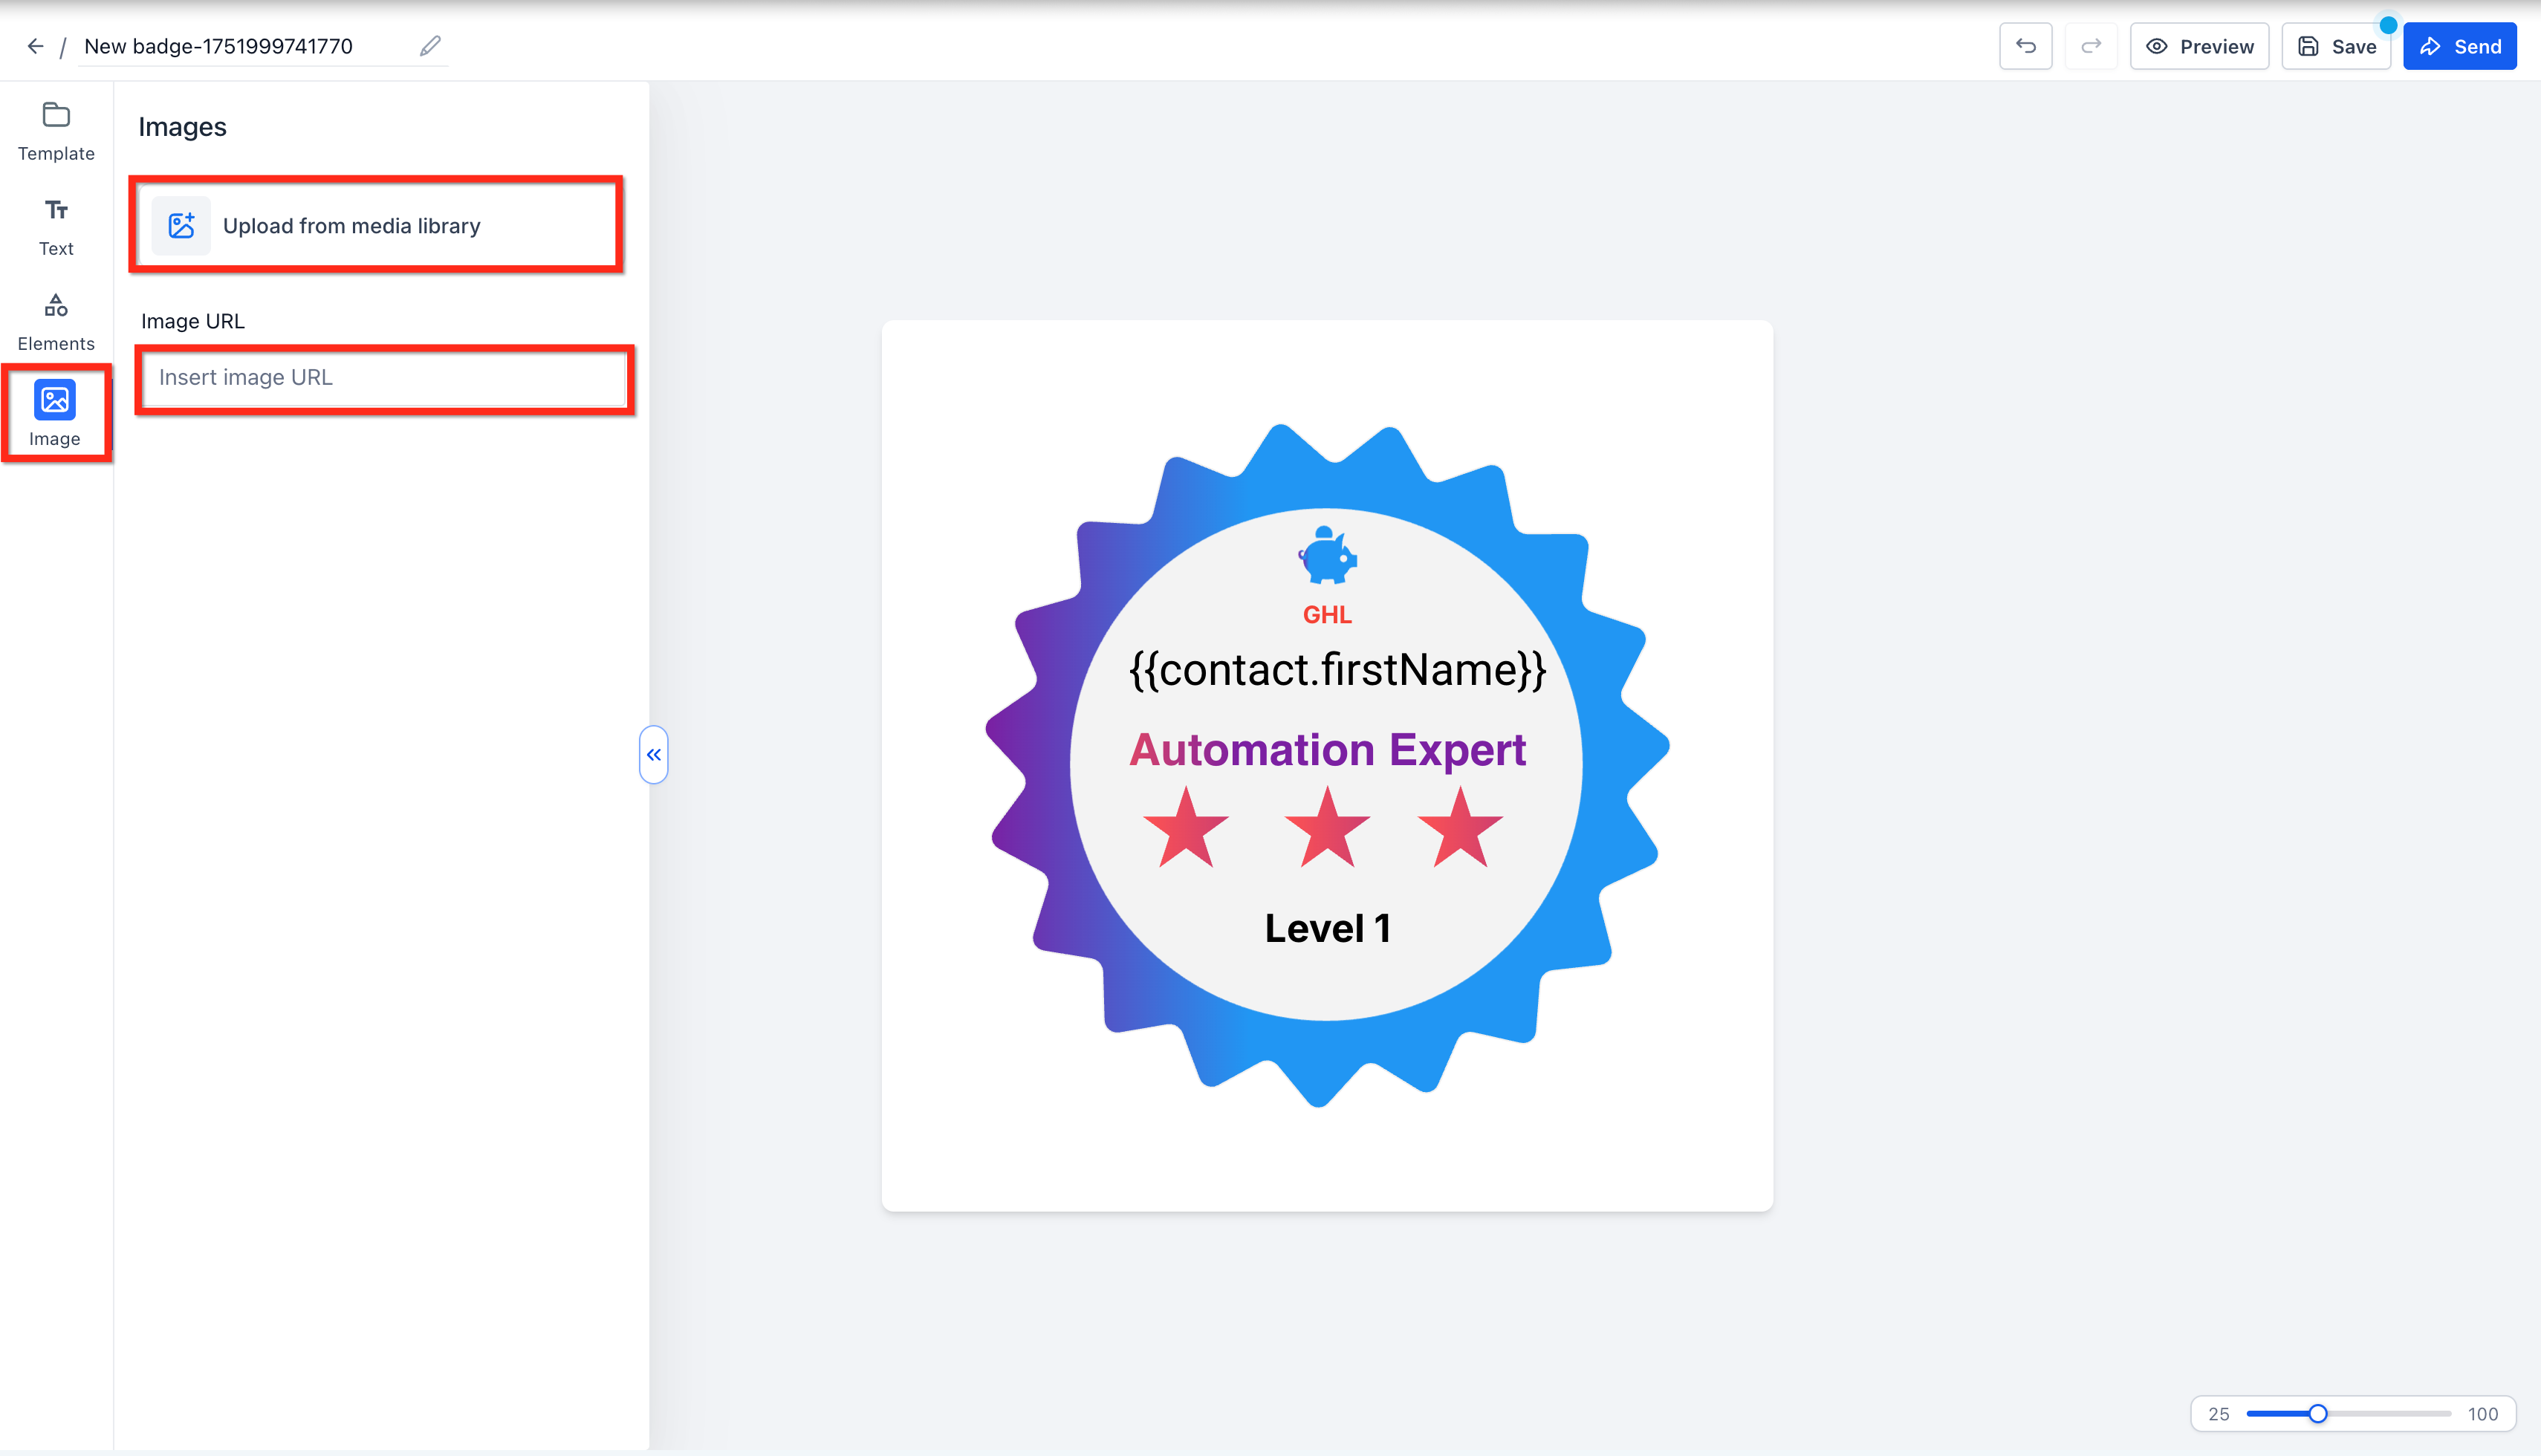
Insert Images - Click Upload Media from Library to use saved assets
- Or paste an Image URL to import an external image
Keyboard Shortcuts
Save time with familiar commands so you can focus on creativity instead of menus.
- Ctrl + X — Cut selected element
- Ctrl + C — Copy selected element
- Ctrl + V — Paste element
Arrow Key Movement
Nudge any element using the arrow keys for pixel-perfect placement.
- ← ↑ → ↓ — Move selected element 1 px
- Shift + Arrow — Jump 10 px for quicker repositioning
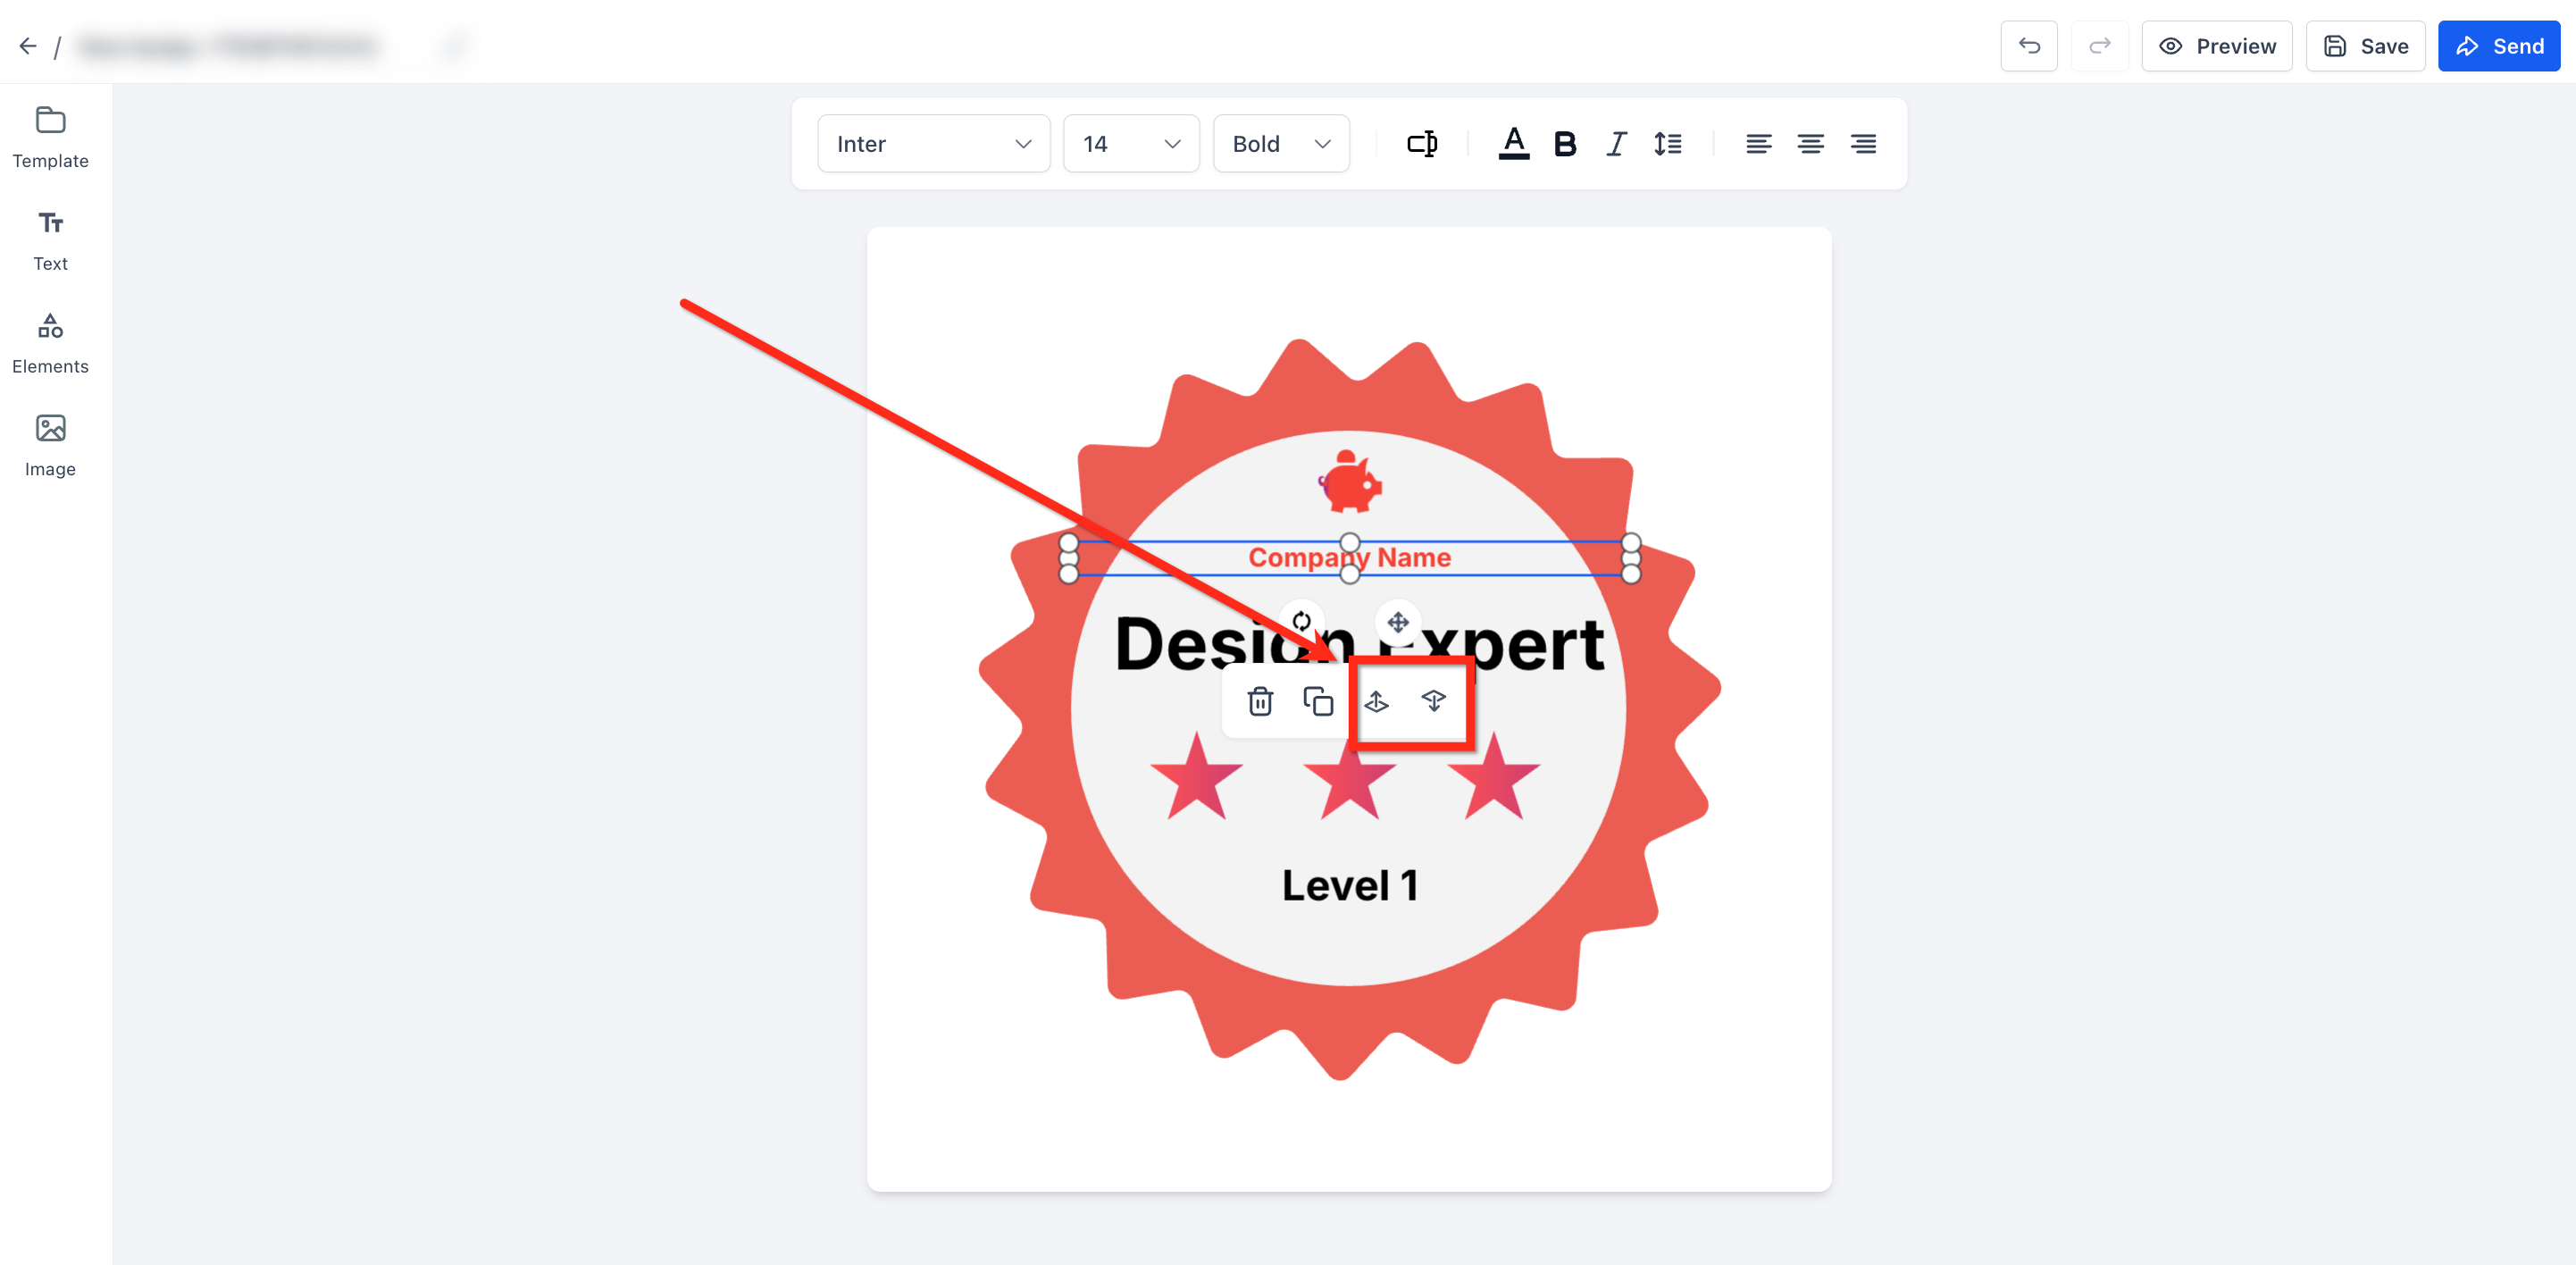
Layer Control
Manage overlapping graphics and text effortlessly to create multi-layered designs.
- Bring Forward — Moves element one layer forward
- Send to Back — Moves element one layer backwards
Step 4: Preview and Save Your Badge - Click the Preview (eye icon) to see how the badge looks.
- Click Save to store the badge in your Patient Copilot directory.
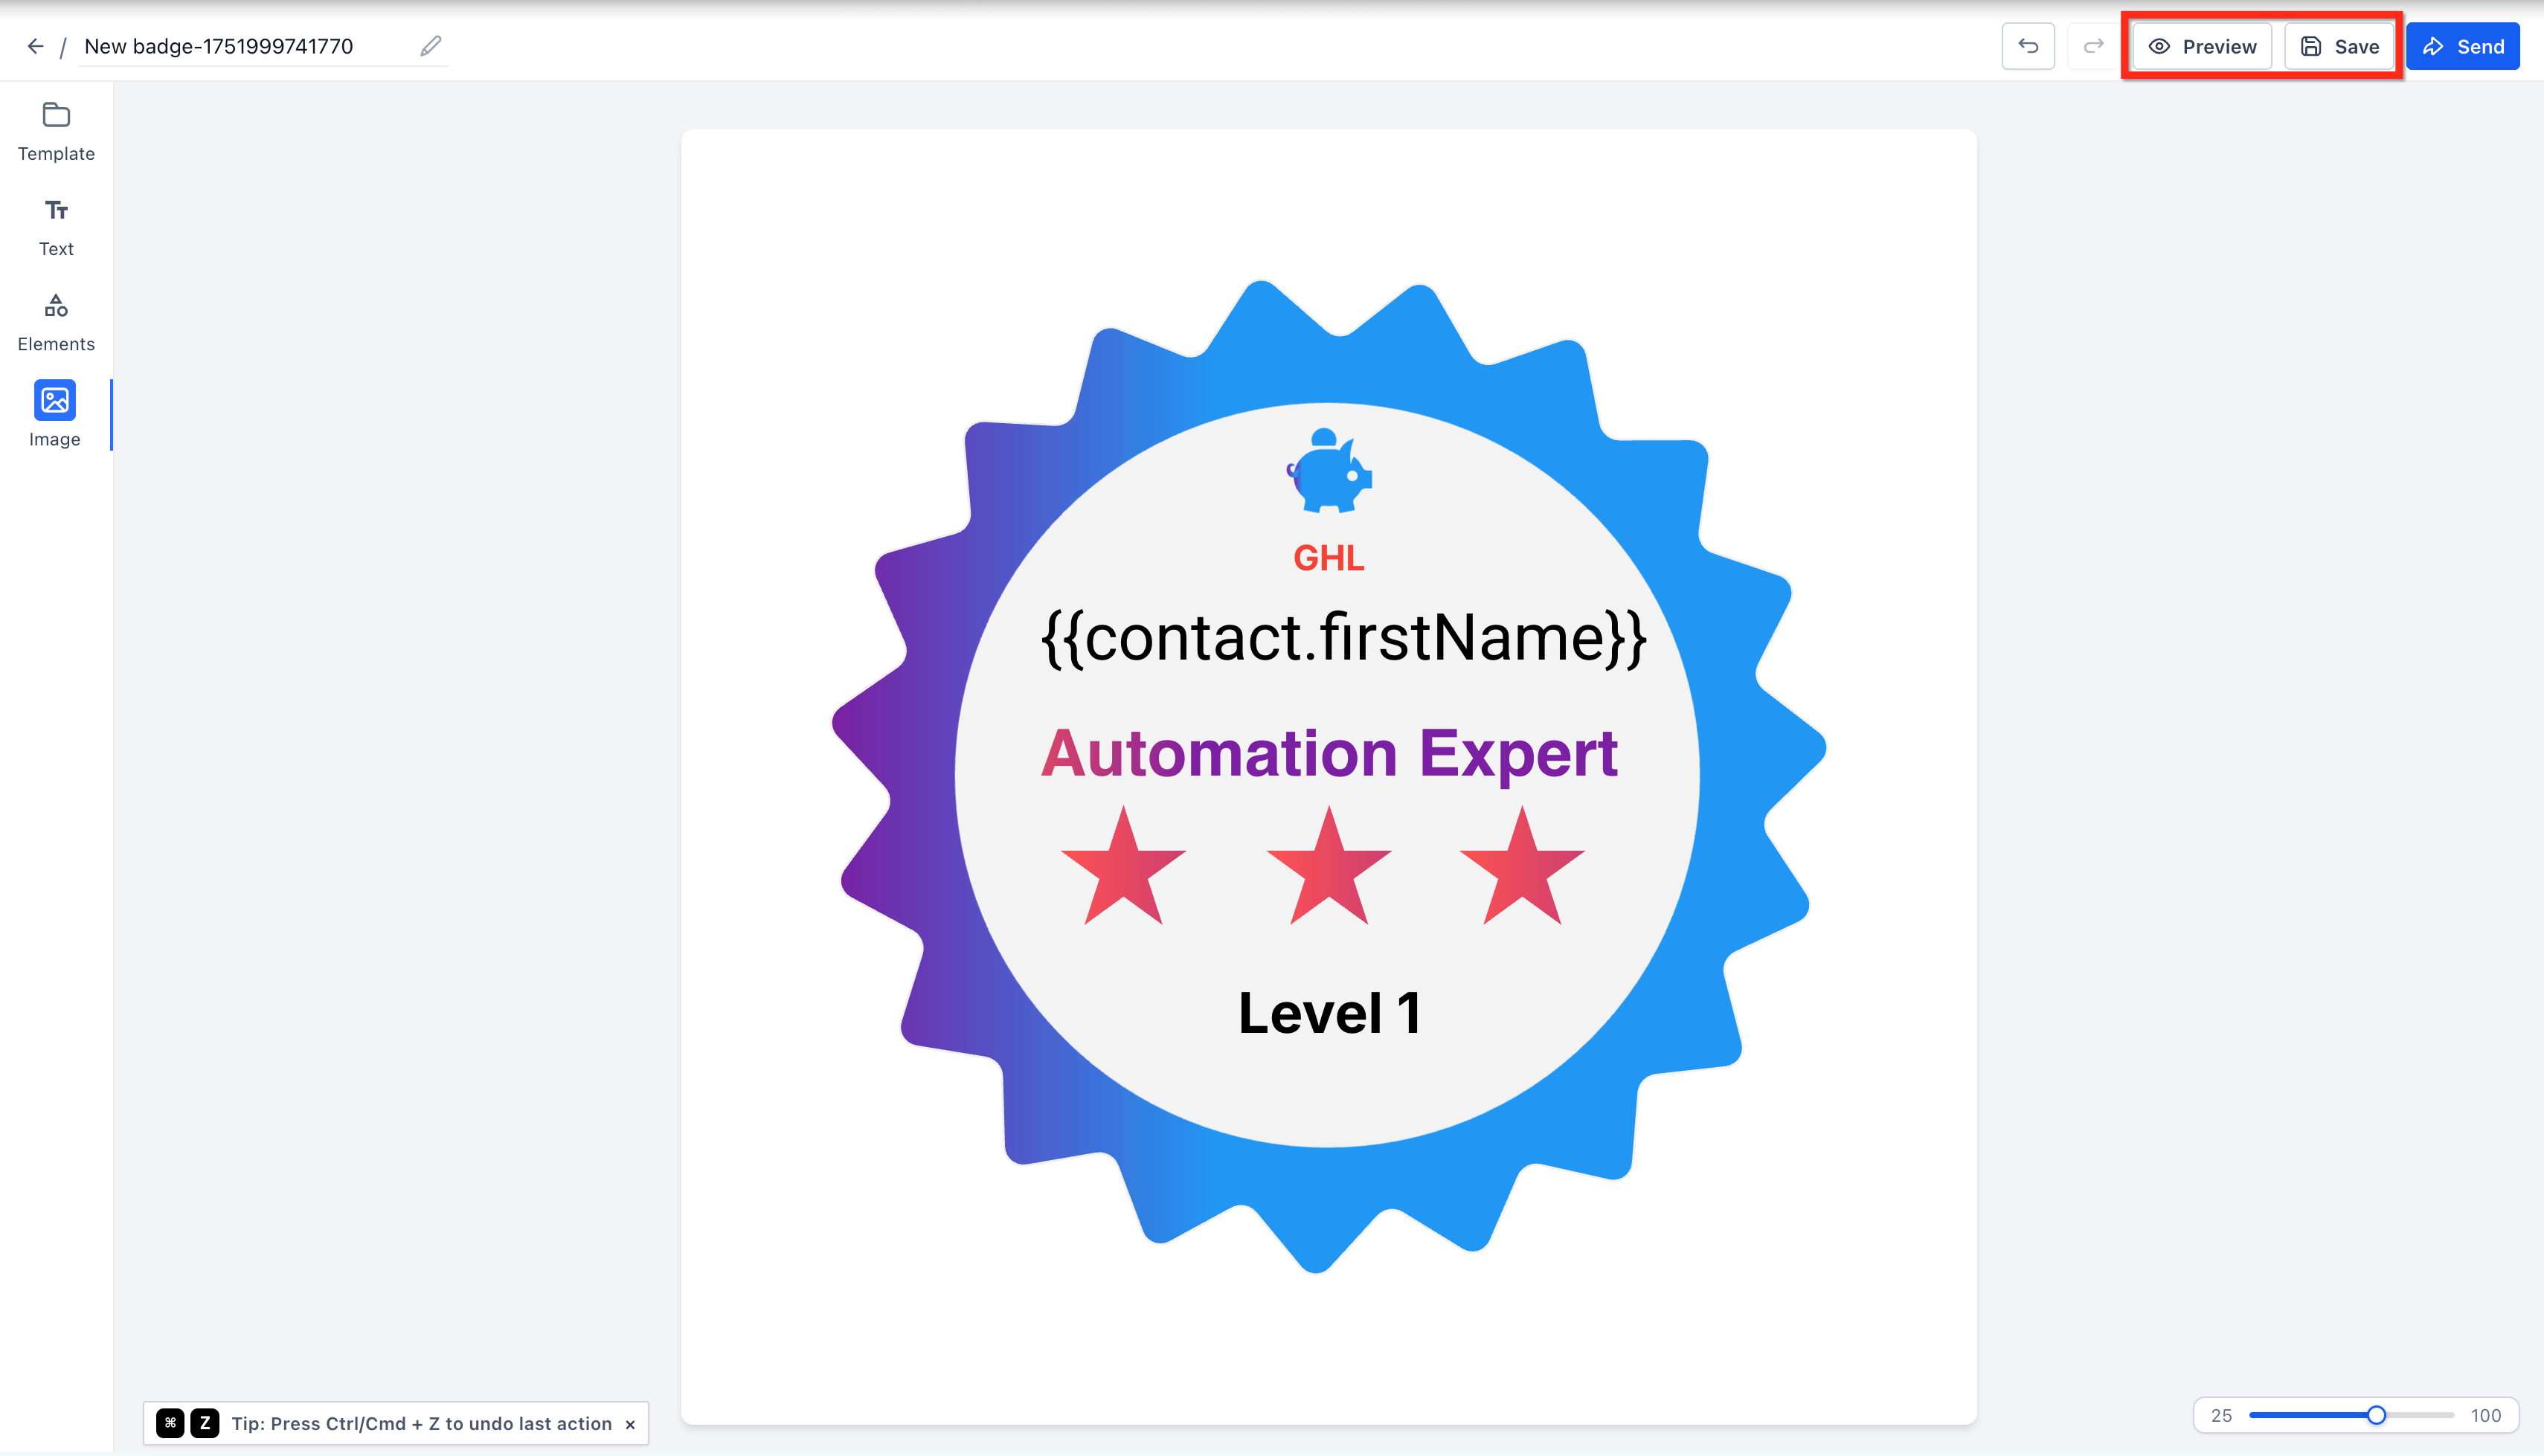
Note: Badge template borders now match the final preview more accurately. Use Preview to confirm the final appearance before you save the badge.
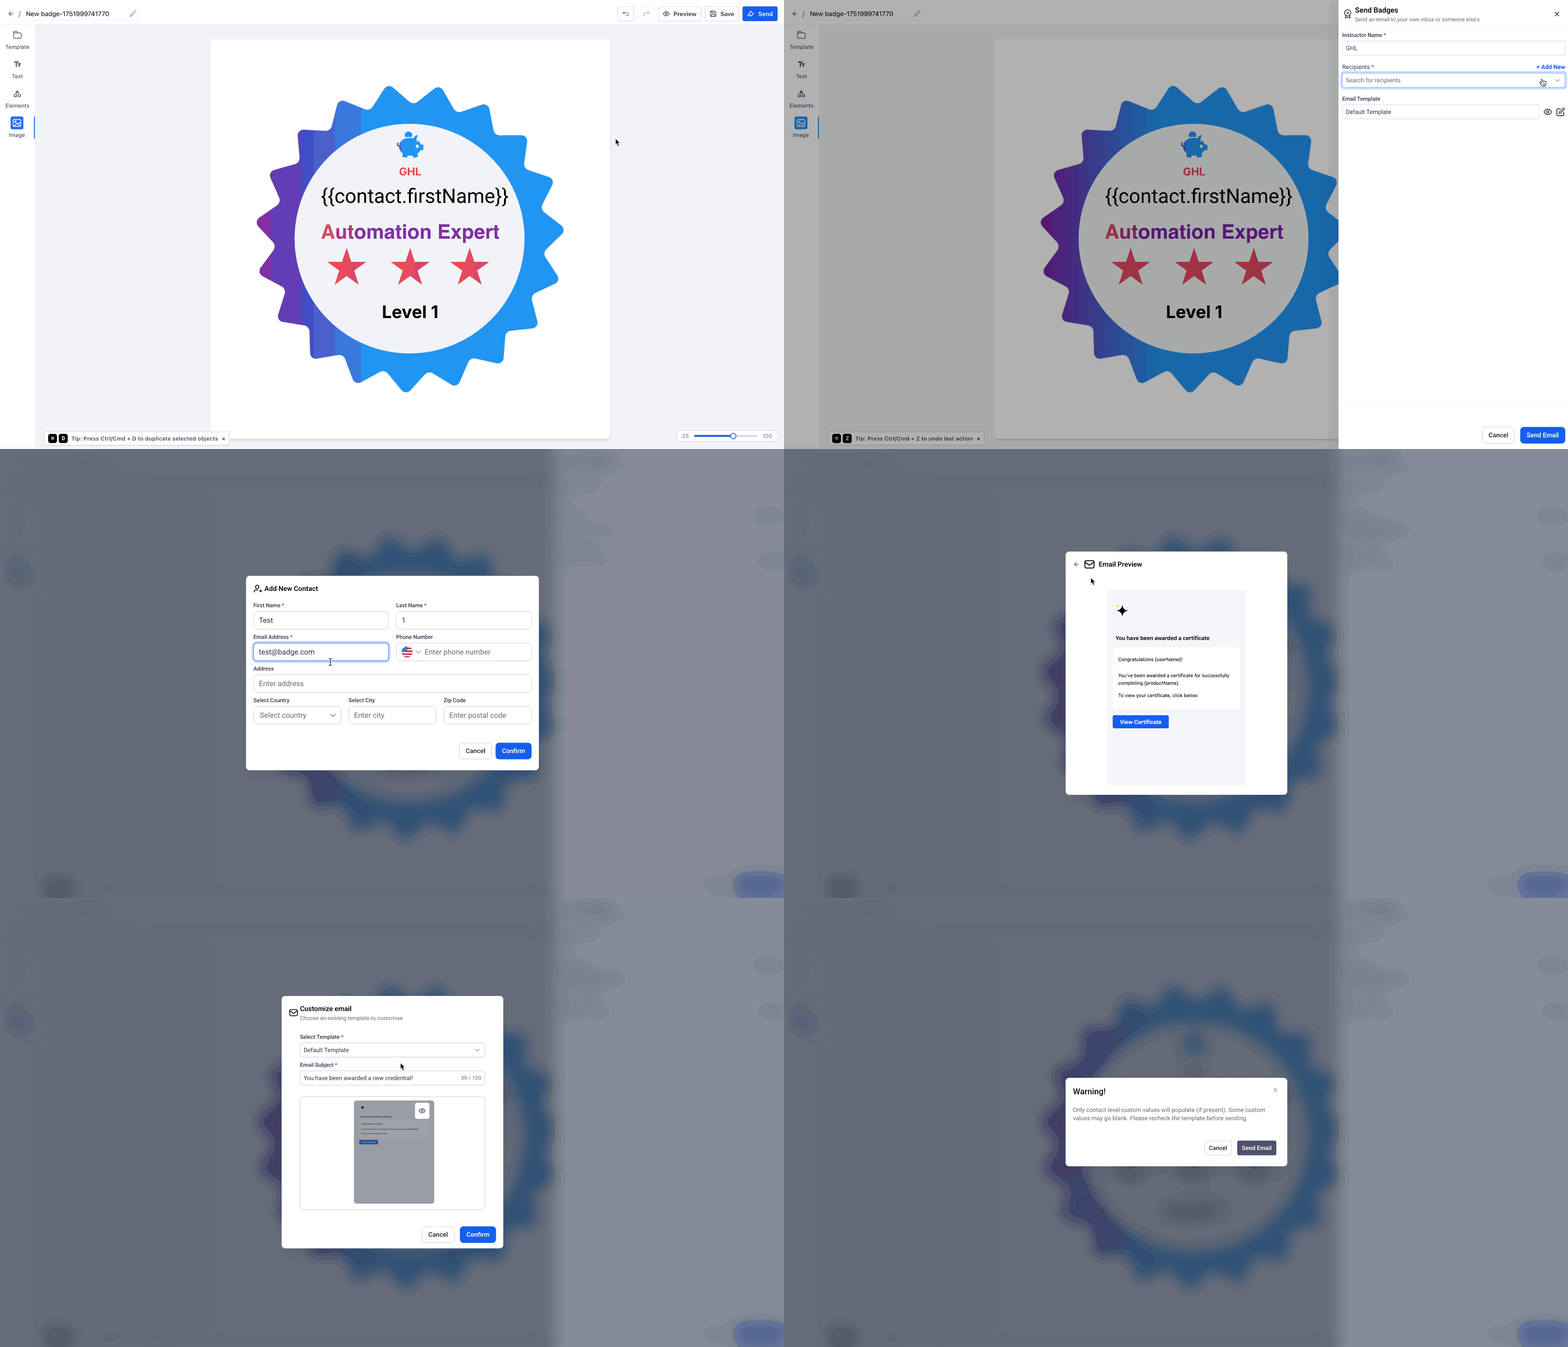
Step 5: Send the Badge via Email - Click the Send button.
- Add an Instructor Name.
- Choose from: Previously saved Recipients Or click Add New to enter a new contact.
- You can use the Default Template or - Click on the Edit button beside the Eye icon to select a saved email template.
- Preview the email using the eye icon. - You can Edit the email subject as per your preference. - Click Confirm, then click Send Email to deliver the badge.
Downloading and Sharing Badges
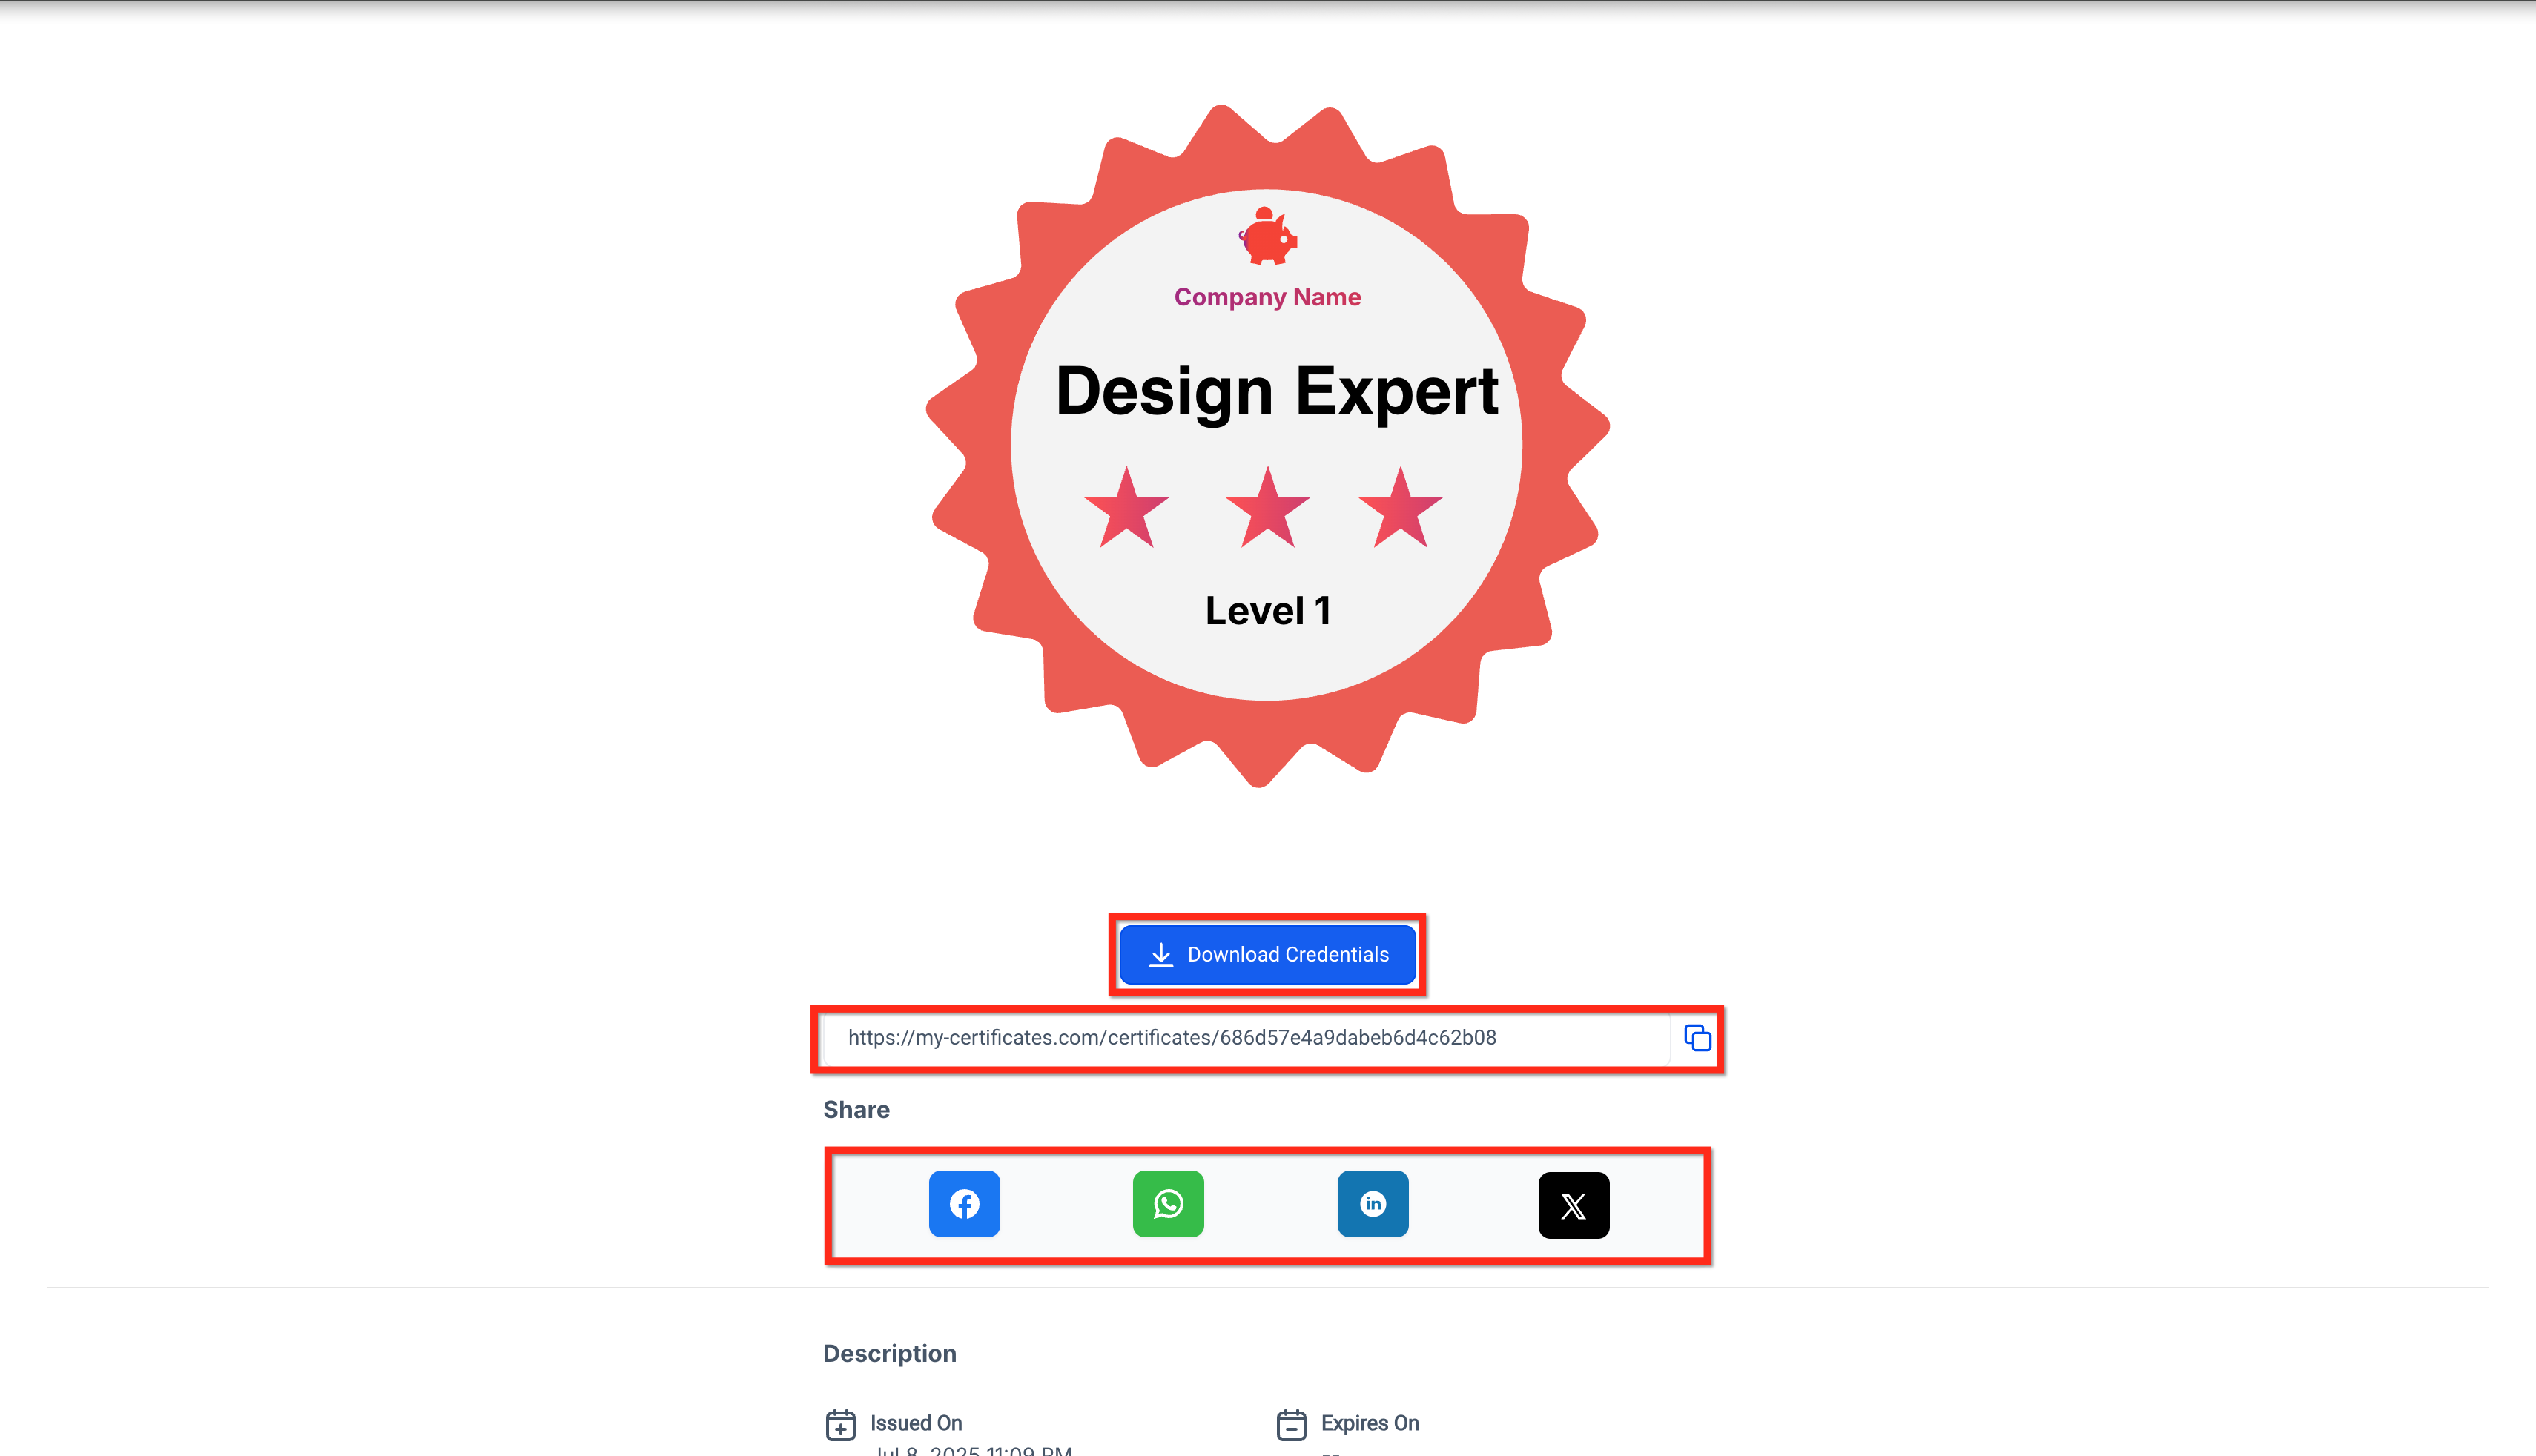
Recipients can download and share badges instantly from the email received.
- Export badges in high-resolution PNG format.
- Share Certificate link.
- Share badges directly to social media platforms.
- Encourage learners to showcase their achievements, increasing your brand’s visibility.
Auto-Save
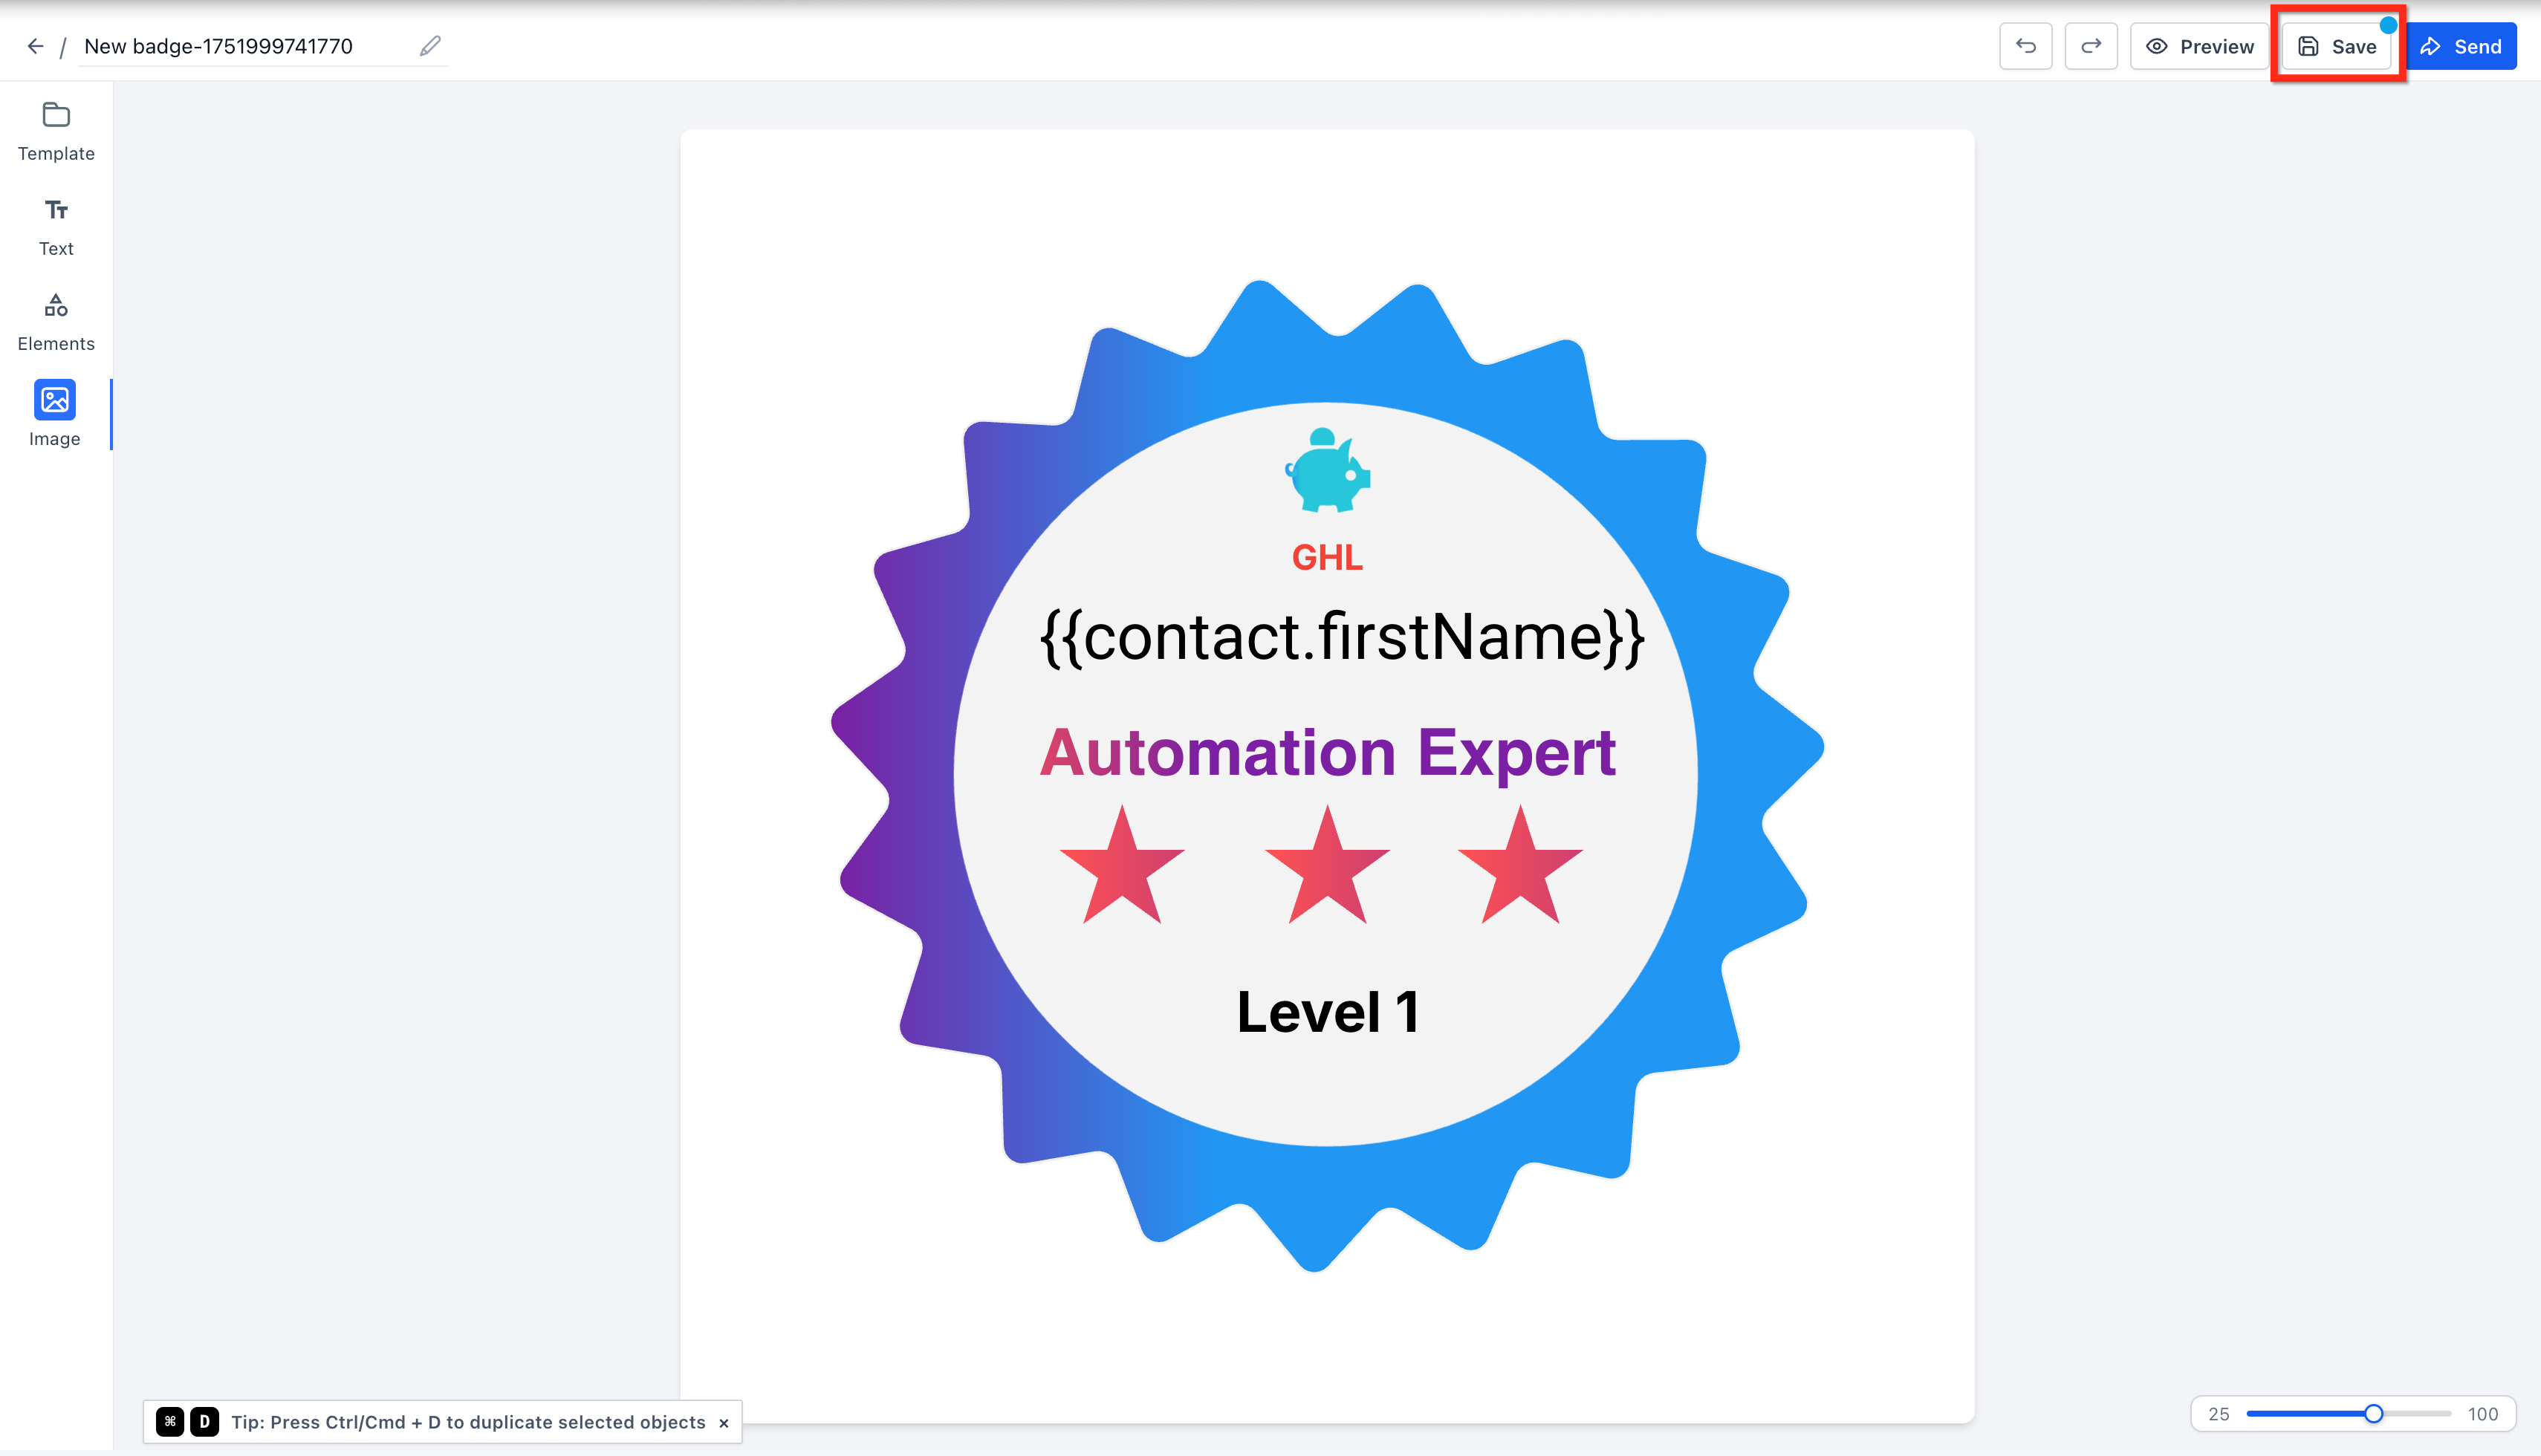
Auto-Save for Badges is a Patient Copilot enhancement that continuously saves your badge projects in real time. This feature ensures that your design progress is saved every 60 seconds without any manual intervention, allowing you to work confidently even in the event of an internet disruption. The blue dot will appear when there are unsaved changes. Click the Save button to manually do it or wait for the blue dot to disappear to know that Auto-Save activated.
Frequently Asked Questions
Q: Can I create my own badge designs from scratch?
Yes, you can start with a blank canvas and fully customize every aspect of your badge. Q: Are badges only available for course completions? No, badges can be issued for any achievement, including skill milestones, lesson completions, or custom criteria you define. Q: Can learners share their badges on social media? Absolutely! Badges can be downloaded or shared directly to social media platforms. Q: Is there a limit to how many badges I can create? There are no limits—create as many badges as you need for your courses and achievements. Q: Can I use my own graphics or icons in badge designs? Yes, you can upload custom graphics or use the built-in element library for your badge designs. Q: Will badges be visible on certificates? Badges are managed within the Certificate Builder and can be associated with certificates or issued independently. Q: Can I assign badges automatically based on course completion? Yes, you can trigger badge awards through automation workflows based on criteria like lesson completion or quiz results. Q: How do I update a badge after it’s been issued? You can edit badge designs at any time, but previously issued badges will retain their original appearance unless reissued. Q: Do arrow keys work to move both text boxes and images? Arrow‑key nudging applies to every element including text, images, shapes, and icons.