Jotform to Patient Copilot (Migration Guide)
This comprehensive guide provides steps for migrating your forms, data, and workflows from JotForm to Patient Copilot. The goal is to ensure a smooth transition with minimal disruption, while fully leveraging Patient Copilot’s integrated marketing and CRM capabilities. * * * ## Preparation for Migration ### Step 1: Review Current JotForm Setup - Identify Key Forms and Data: List all active forms in JotForm, including any associated data, such as submission entries, email notifications, and integrations.
- Document Form Workflows: Record details of how each form interacts with your current workflows, email notifications, and any third-party integrations.
- Assess Data Volume: Evaluate the amount of data (e.g., form submissions, contact information) to be migrated. ### Step 2: Define Migration Goals - Set Clear Objectives: Determine what you want to achieve by migrating to Patient Copilot, such as enhanced automation, better integration with CRM tools, or cost savings.
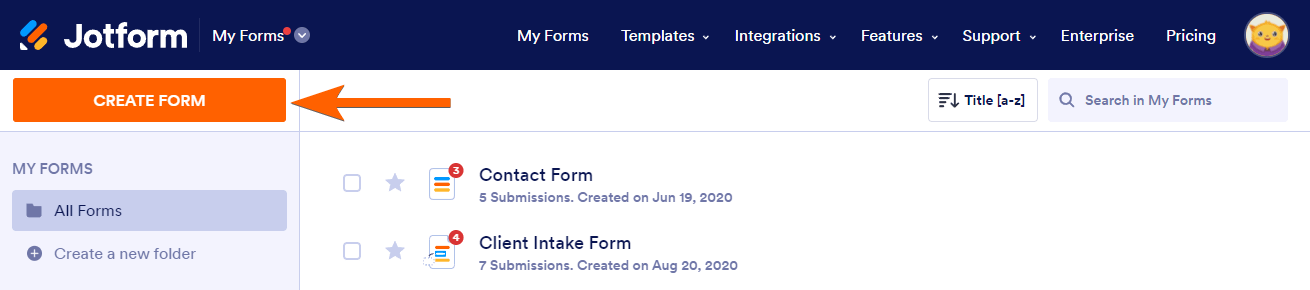
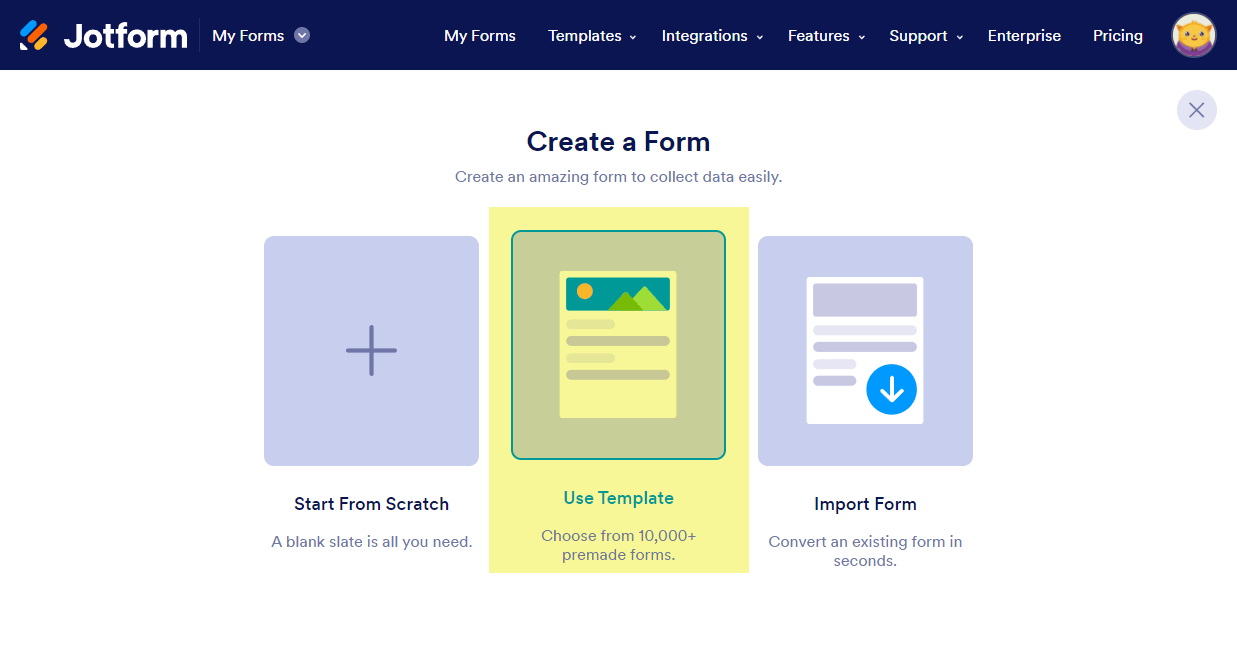
- Prioritize Features: Decide which forms and data are most critical to migrate first. ### Step 3: Prepare Backup - Export Data from JotForm: Export all necessary data from JotForm, including form submissions, templates, and configurations.
- Backup Data: Ensure all data is securely backed up before beginning the migration process.!(https://assets.patientcopilot.ai/7a509f657f840977.png) * * * ## Migrate Data ### Step 1: Export Data from JotForm - Export Form Submissions: Navigate to each form in JotForm, select the form submissions, and export them as CSV files.
- Export Form Templates: Save copies of your JotForm templates for reference during the recreation process in Patient Copilot. ### Step 2: Import Data into Patient Copilot - Recreate Forms in Patient Copilot: - Navigate to Sites > Formsin Patient Copilot. - Use the form builder to recreate your forms, ensuring that all fields match those from JotForm.
- Import Contacts: If you have contact information stored in JotForm, import this data into Patient Copilot by navigating to Contacts > Import Contacts and uploading your CSV files.
- Set Up Custom Fields: In Patient Copilot, create any necessary custom fields that match the data you were collecting in JotForm.!(https://assets.patientcopilot.ai/4eb32da3f99c713b.png) * * * ## Migrate Forms and Workflows ### Step 1: Review Existing JotForm Workflows - List Active Workflows: Identify and document all workflows triggered by form submissions in JotForm, such as email notifications, data routing, and integrations with other tools.
- Evaluate Workflow Complexity: Assess the complexity of each workflow to determine how best to replicate it in Patient Copilot. ### Step 2: Recreate Workflows in Patient Copilot - Create Automation Triggers: - In Patient Copilot, navigate to Automation > Workflows. - Set up triggers for each form submission that replicates the logic from your JotForm workflows (e.g., sending notifications, updating contact records).
- Rebuild Actions and Conditions: - Recreate actions such as sending confirmation emails, tagging contacts, or updating CRM records. - Set up any necessary conditions or branching logic to mirror your existing workflows. ### Step 3: Test Workflows - Run Tests: Before activating workflows, conduct thorough testing to ensure they function as intended.
- Adjust Settings: Make necessary adjustments based on test results to ensure smooth operation. * * * ## Migrate Integrations and Notifications ### Step 1: Recreate Integrations in Patient Copilot - Identify Necessary Integrations: Determine which third-party tools you were integrating with JotForm, such as payment gateways, email marketing tools, or CRMs.
- Set Up Integrations in Patient Copilot: - Use Patient Copilot’s built-in integrations or Zapier to connect to external applications. - Go to Settings > Integrations to set up necessary connections. ### Step 2: Recreate Email Notifications - Set Up Internal Notifications: - In Patient Copilot, navigate to Automation > Workflows and set up internal notifications for when a form is submitted.
- Configure Autoresponders: If you were using autoresponders in JotForm, set these up in Patient Copilot by creating automated email sequences that trigger upon form submission.!(https://assets.patientcopilot.ai/c59fca3da4b0c72c.png)!(https://assets.patientcopilot.ai/09a949ee675a0d92.png) * * * ## Final Checks and Training ### Step 1: Perform Final Data Validation - Cross-Check Data: Ensure that all data has been successfully migrated and that there are no discrepancies between JotForm and Patient Copilot records.
- Validate Forms and Workflows: Confirm that all forms and workflows are operational in Patient Copilot. ### Step 2: Train Team Members - Patient Copilot Training: Provide training to your team on how to use Patient Copilot’s form builder and automation tools, focusing on the differences from JotForm.
- Utilize Patient Copilot Support: Encourage team members to leverage Patient Copilot’s support resources and community forums for ongoing learning. ### Step 3: Monitor and Optimize - Monitor Performance: Track the performance of your new setup in Patient Copilot, making adjustments as necessary.
- Continuous Improvement: Regularly review and refine forms, workflows, and integrations to ensure they align with business goals. * * * ## Decommissioning JotForm ### Step 1: Transition Period - Run in Parallel: Consider running JotForm and Patient Copilot in parallel during the transition phase to ensure no critical operations are missed.
- Gradual Phase-Out: Gradually reduce reliance on JotForm as Patient Copilot becomes fully operational. ### Step 2: Cancel JotForm Subscription - Final Data Backup: Before canceling your JotForm subscription, ensure all data is securely backed up.
- Official Cancellation: Follow JotForm’s process to cancel your subscription and terminate services. ### Step 3: Post-Migration Review - Review Success: Evaluate the success of the migration process and document any lessons learned.
- Continuous Monitoring: Keep monitoring the system post-migration for any potential issues. Was this article helpful? That’s Great! Thank you for your feedback Sorry! We couldn’t be helpful Thank you for your feedback Feedback sent We appreciate your effort and will try to fix the article
!(https://assets.patientcopilot.ai/09a949ee675a0d92.png)